创建好私有仓库之后,就可以使用 docker tag 来标记一个镜像,然后推送它到仓库。例如私有仓库地址为 127.0.0.1:5000。
先在本机查看已有的镜像。
1 2 3
$ docker image ls REPOSITORY TAG IMAGE ID CREATED VIRTUAL SIZE ubuntu latest ba5877dc9bec 6 weeks ago 192.7 MB
使用 docker tag 将 ubuntu:latest 这个镜像标记为 127.0.0.1:5000/ubuntu:latest。
格式为 docker tag IMAGE[:TAG] [REGISTRY_HOST[:REGISTRY_PORT]/]REPOSITORY[:TAG]。
1 2 3 4 5
$ docker tag ubuntu:latest 127.0.0.1:5000/ubuntu:latest $ docker image ls REPOSITORY TAG IMAGE ID CREATED VIRTUAL SIZE ubuntu latest ba5877dc9bec 6 weeks ago 192.7 MB 127.0.0.1:5000/ubuntu:latest latest ba5877dc9bec 6 weeks ago 192.7 MB
使用 -d 参数启动后会返回一个唯一的 id,也可以通过 docker container ls 命令来查看容器信息。
1 2 3
$ docker container ls CONTAINER ID IMAGE COMMAND CREATED STATUS PORTS NAMES 77b2dc01fe0f ubuntu:18.04 /bin/sh -c 'while tr 2 minutes ago Up 1 minute agitated_wright
要获取容器的输出信息,可以通过 docker container logs 命令。
1 2 3 4 5
$ docker container logs [container ID or NAMES] hello world hello world hello world . . .
$ docker container ls -a CONTAINER ID IMAGE COMMAND CREATED STATUS PORTS NAMES ba267838cc1b ubuntu:18.04 "/bin/bash" 30 minutes ago Exited (0) About a minute ago trusting_newton
$ docker run -dit ubuntu 243c32535da7d142fb0e6df616a3c3ada0b8ab417937c853a9e1c251f499f550
$ docker container ls CONTAINER ID IMAGE COMMAND CREATED STATUS PORTS NAMES 243c32535da7 ubuntu:latest "/bin/bash" 18 seconds ago Up 17 seconds nostalgic_hypatia
只用 -i 参数时,由于没有分配伪终端,界面没有我们熟悉的 Linux 命令提示符,但命令执行结果仍然可以返回。
当 -i-t 参数一起使用时,则可以看到我们熟悉的 Linux 命令提示符。
1 2 3 4 5 6 7 8 9 10 11 12 13 14 15 16
$ docker run -dit ubuntu 69d137adef7a8a689cbcb059e94da5489d3cddd240ff675c640c8d96e84fe1f6
$ docker container ls CONTAINER ID IMAGE COMMAND CREATED STATUS PORTS NAMES 69d137adef7a ubuntu:latest "/bin/bash" 18 seconds ago Up 17 seconds zealous_swirles
$ docker container ls -a CONTAINER ID IMAGE COMMAND CREATED STATUS PORTS NAMES 7691a814370e ubuntu:18.04 "/bin/bash" 36 hours ago Exited (0) 21 hours ago test $ docker export 7691a814370e > ubuntu.tar
$ cat ubuntu.tar | docker import - test/ubuntu:v1.0 $ docker image ls REPOSITORY TAG IMAGE ID CREATED VIRTUAL SIZE test/ubuntu v1.0 9d37a6082e97 About a minute ago 171.3 MB
$ docker run myip -i docker: Error response from daemon: invalid header field value "oci runtime error: container_linux.go:247: starting container process caused \"exec: \\\"-i\\\": executable file not found in $PATH\"\n".
$ docker run myip -i HTTP/1.1 200 OK Server: nginx/1.8.0 Date: Tue, 22 Nov 2016 05:12:40 GMT Content-Type: text/html; charset=UTF-8 Vary: Accept-Encoding X-Powered-By: PHP/5.6.24-1~dotdeb+7.1 X-Cache: MISS from cache-2 X-Cache-Lookup: MISS from cache-2:80 X-Cache: MISS from proxy-2_6 Transfer-Encoding: chunked Via: 1.1 cache-2:80, 1.1 proxy-2_6:8006 Connection: keep-alive
#!/bin/sh ... # allow the container to be started with `--user` if [ "$1" = 'redis-server' -a "$(id -u)" = '0' ]; then find . \! -user redis -execchown redis '{}' + exec gosu redis "$0""$@" fi
之前说过每一个 RUN 都是启动一个容器、执行命令、然后提交存储层文件变更。第一层 RUN cd /app 的执行仅仅是当前进程的工作目录变更,一个内存上的变化而已,其结果不会造成任何文件变更。而到第二层的时候,启动的是一个全新的容器,跟第一层的容器更完全没关系,自然不可能继承前一层构建过程中的内存变化。
当运行该镜像后,可以通过 docker container ls 看到最初的状态为 (health: starting):
1 2 3
$ docker container ls CONTAINER ID IMAGE COMMAND CREATED STATUS PORTS NAMES 03e28eb00bd0 myweb:v1 "nginx -g 'daemon off" 3 seconds ago Up 2 seconds (health: starting) 80/tcp, 443/tcp web
$ docker container ls CONTAINER ID IMAGE COMMAND CREATED STATUS PORTS NAMES 03e28eb00bd0 myweb:v1 "nginx -g 'daemon off" 18 seconds ago Up 16 seconds (healthy) 80/tcp, 443/tcp web
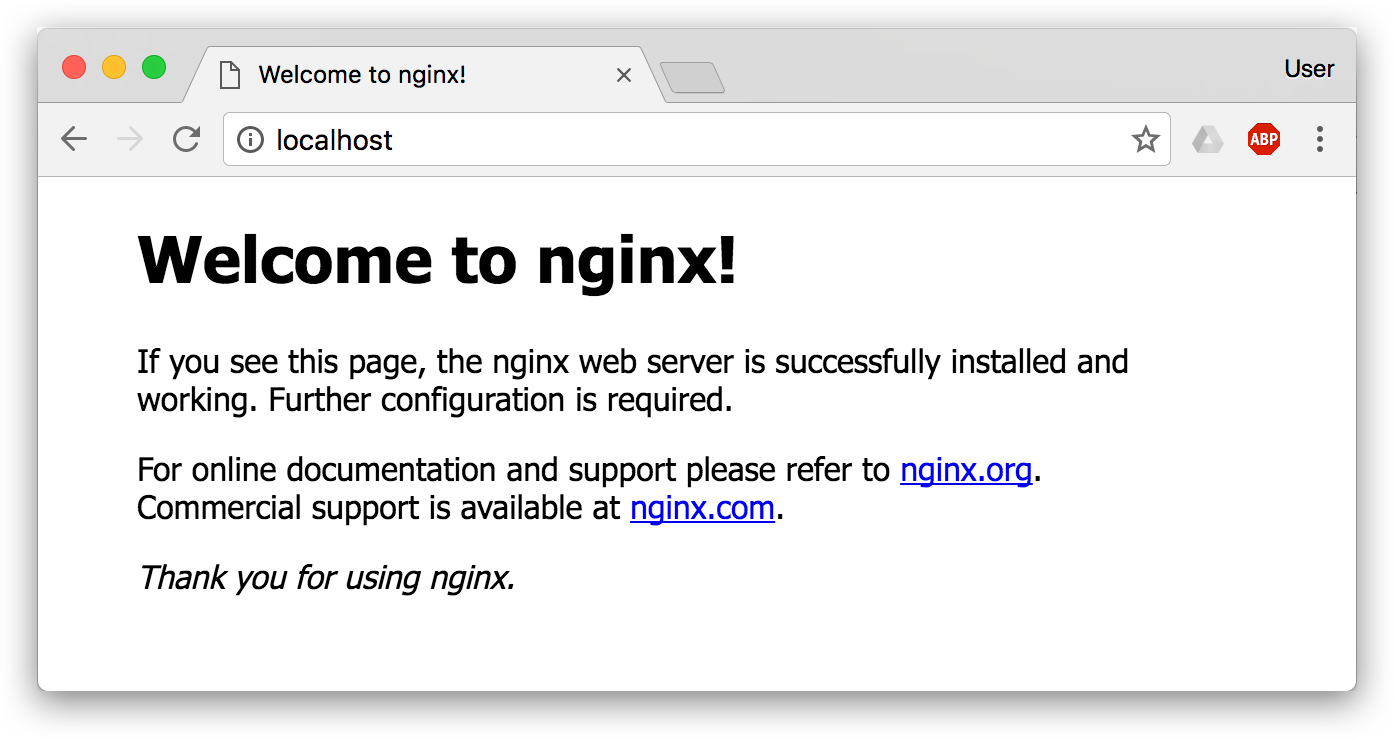
$ docker inspect --format '{{json .State.Health}}' web | python -m json.tool { "FailingStreak": 0, "Log": [ { "End": "2016-11-25T14:35:37.940957051Z", "ExitCode": 0, "Output": "<!DOCTYPE html>\n<html>\n<head>\n<title>Welcome to nginx!</title>\n<style>\n body {\n width: 35em;\n margin: 0 auto;\n font-family: Tahoma, Verdana, Arial, sans-serif;\n }\n</style>\n</head>\n<body>\n<h1>Welcome to nginx!</h1>\n<p>If you see this page, the nginx web server is successfully installed and\nworking. Further configuration is required.</p>\n\n<p>For online documentation and support please refer to\n<a href=\"http://nginx.org/\">nginx.org</a>.<br/>\nCommercial support is available at\n<a href=\"http://nginx.com/\">nginx.com</a>.</p>\n\n<p><em>Thank you for using nginx.</em></p>\n</body>\n</html>\n", "Start": "2016-11-25T14:35:37.780192565Z" } ], "Status": "healthy" }
RUN go get -d -v github.com/go-sql-driver/mysql \ && CGO_ENABLED=0 GOOS=linux go build -a -installsuffix cgo -o app . \ && cp /go/src/github.com/go/helloworld/app /root
REPOSITORY TAG IMAGE ID CREATED SIZE go/helloworld 3 d6911ed9c846 7 seconds ago 6.47MB go/helloworld 2 f7cf3465432c 22 seconds ago 6.47MB go/helloworld 1 f55d3e16affc 2 minutes ago 295MB
$ docker image ls REPOSITORY TAG IMAGE ID CREATED SIZE redis latest 5f515359c7f8 5 days ago 183 MB nginx latest 05a60462f8ba 5 days ago 181 MB mongo 3.2 fe9198c04d62 5 days ago 342 MB <none> <none> 00285df0df87 5 days ago 342 MB ubuntu 18.04 329ed837d508 3 days ago 63.3MB ubuntu bionic 329ed837d508 3 days ago 63.3MB
列表包含了 仓库名、标签、镜像 ID、创建时间 以及 所占用的空间。
其中仓库名、标签在之前的基础概念章节已经介绍过了。镜像 ID 则是镜像的唯一标识,一个镜像可以对应多个 标签。因此,在上面的例子中,我们可以看到 ubuntu:18.04 和 ubuntu:bionic 拥有相同的 ID,因为它们对应的是同一个镜像。
另外一个需要注意的问题是,docker image ls 列表中的镜像体积总和并非是所有镜像实际硬盘消耗。由于 Docker 镜像是多层存储结构,并且可以继承、复用,因此不同镜像可能会因为使用相同的基础镜像,从而拥有共同的层。由于 Docker 使用 Union FS,相同的层只需要保存一份即可,因此实际镜像硬盘占用空间很可能要比这个列表镜像大小的总和要小的多。
你可以通过 docker system df 命令来便捷的查看镜像、容器、数据卷所占用的空间。
1
2
3
4
5
6
7
$ docker system df
TYPE TOTAL ACTIVE SIZE RECLAIMABLE Images 24 0 1.992GB 1.992GB (100%) Containers 1 0 62.82MB 62.82MB (100%) Local Volumes 9 0 652.2MB 652.2MB (100%) Build Cache 0B 0B
不加任何参数的情况下,docker image ls 会列出所有顶层镜像,但是有时候我们只希望列出部分镜像。docker image ls 有好几个参数可以帮助做到这个事情。
根据仓库名列出镜像
1
2
3
4
$ docker image ls ubuntu REPOSITORY TAG IMAGE ID CREATED SIZE ubuntu 18.04 329ed837d508 3 days ago 63.3MB ubuntu bionic 329ed837d508 3 days ago 63.3MB
列出特定的某个镜像,也就是说指定仓库名和标签
1
2
3
$ docker image ls ubuntu:18.04 REPOSITORY TAG IMAGE ID CREATED SIZE ubuntu 18.04 329ed837d508 3 days ago 63.3MB
除此以外,docker image ls 还支持强大的过滤器参数 --filter,或者简写 -f。之前我们已经看到了使用过滤器来列出虚悬镜像的用法,它还有更多的用法。比如,我们希望看到在 mongo:3.2 之后建立的镜像,可以用下面的命令:
1 2 3 4
$ docker image ls -f since=mongo:3.2 REPOSITORY TAG IMAGE ID CREATED SIZE redis latest 5f515359c7f8 5 days ago 183 MB nginx latest 05a60462f8ba 5 days ago 181 MB
想查看某个位置之前的镜像也可以,只需要把 since 换成 before 即可。
此外,如果镜像构建时,定义了 LABEL,还可以通过 LABEL 来过滤。
1 2
$ docker image ls -f label=com.example.version=0.1 ...
$ docker image ls --digests REPOSITORY TAG DIGEST IMAGE ID CREATED SIZE node slim sha256:b4f0e0bdeb578043c1ea6862f0d40cc4afe32a4a582f3be235a3b164422be228 6e0c4c8e3913 3 weeks ago 214 MB
$ docker diff webserver C /root A /root/.bash_history C /run C /usr C /usr/share C /usr/share/nginx C /usr/share/nginx/html C /usr/share/nginx/html/index.html C /var C /var/cache C /var/cache/nginx A /var/cache/nginx/client_temp A /var/cache/nginx/fastcgi_temp A /var/cache/nginx/proxy_temp A /var/cache/nginx/scgi_temp A /var/cache/nginx/uwsgi_temp
$ docker image ls nginx REPOSITORY TAG IMAGE ID CREATED SIZE nginx v2 07e334659748 9 seconds ago 181.5 MB nginx 1.11 05a60462f8ba 12 days ago 181.5 MB nginx latest e43d811ce2f4 4 weeks ago 181.5 MB
我们还可以用 docker history 具体查看镜像内的历史记录,如果比较 nginx:latest 的历史记录,我们会发现新增了我们刚刚提交的这一层。
1 2 3 4 5 6 7 8 9 10 11
$ docker history nginx:v2 IMAGE CREATED CREATED BY SIZE COMMENT 07e334659748 54 seconds ago nginx -g daemon off; 95 B 修改了默认网页 e43d811ce2f4 4 weeks ago /bin/sh -c #(nop) CMD ["nginx" "-g" "daemon 0 B <missing> 4 weeks ago /bin/sh -c #(nop) EXPOSE 443/tcp 80/tcp 0 B <missing> 4 weeks ago /bin/sh -c ln -sf /dev/stdout /var/log/nginx/ 22 B <missing> 4 weeks ago /bin/sh -c apt-key adv --keyserver hkp://pgp. 58.46 MB <missing> 4 weeks ago /bin/sh -c #(nop) ENV NGINX_VERSION=1.11.5-1 0 B <missing> 4 weeks ago /bin/sh -c #(nop) MAINTAINER NGINX Docker Ma 0 B <missing> 4 weeks ago /bin/sh -c #(nop) CMD ["/bin/bash"] 0 B <missing> 4 weeks ago /bin/sh -c #(nop) ADD file:23aa4f893e3288698c 123 MB
不以任何系统为基础,直接将可执行文件复制进镜像的做法并不罕见,对于 Linux 下静态编译的程序来说,并不需要有操作系统提供运行时支持,所需的一切库都已经在可执行文件里了,因此直接 FROM scratch 会让镜像体积更加小巧。使用 Go 语言 (opens new window) 开发的应用很多会使用这种方式来制作镜像,这也是为什么有人认为 Go 是特别适合容器微服务架构的语言的原因之一。
既然 RUN 就像 Shell 脚本一样可以执行命令,那么我们是否就可以像 Shell 脚本一样把每个命令对应一个 RUN 呢?比如这样:
1
2
3
4
5
6
7
8
9
FROM debian:stretch
RUN apt-get update RUN apt-get install -y gcc libc6-dev make wget RUN wget -O redis.tar.gz "http://download.redis.io/releases/redis-5.0.3.tar.gz" RUNmkdir -p /usr/src/redis RUN tar -xzf redis.tar.gz -C /usr/src/redis --strip-components=1 RUN make -C /usr/src/redis RUN make -C /usr/src/redis install
之前说过,Dockerfile 中每一个指令都会建立一层,RUN 也不例外。每一个 RUN 的行为,就和刚才我们手工建立镜像的过程一样:新建立一层,在其上执行这些命令,执行结束后,commit 这一层的修改,构成新的镜像。
Downloading from http://download.openvz.org/template/precreated/ubuntu-16.04-x86_64.tar.gz sha256:412b8fc3e3f786dca0197834a698932b9c51b69bd8cf49e100c35d38c9879213
$ docker image ls openvz/ubuntu REPOSITORY TAG IMAGE ID CREATED SIZE openvz/ubuntu 16.04 412b8fc3e3f7 55 seconds ago 505MB
如果我们查看其历史的话,会看到描述中有导入的文件链接:
1 2 3
$ docker history openvz/ubuntu:16.04 IMAGE CREATED CREATED BY SIZE COMMENT f477a6e18e98 About a minute ago 214.9 MB Imported from http://download.openvz.org/template/precreated/ubuntu-16.04-x86_64.tar.gz
因为镜像包含操作系统完整的 root 文件系统,其体积往往是庞大的,因此在 Docker 设计时,就充分利用 Union FS (opens new window) 的技术,将其设计为分层存储的架构。所以严格来说,镜像并非是像一个 ISO 那样的打包文件,镜像只是一个虚拟的概念,其实际体现并非由一个文件组成,而是由一组文件系统组成,或者说,由多层文件系统联合组成。
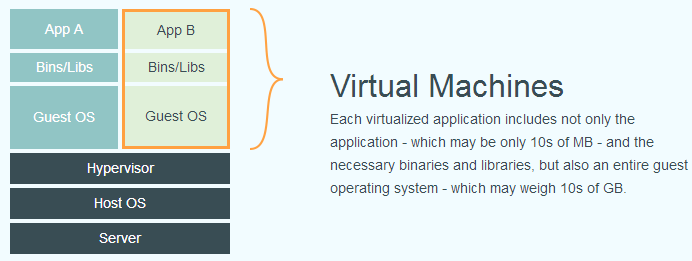
虚拟机(virtual machine)就是带环境安装的一种解决方案。它可以在一种操作系统里面运行另一种操作系统,比如在 Windows 系统里面运行 Linux 系统。应用程序对此毫无感知,因为虚拟机看上去跟真实系统一模一样,而对于底层系统来说,虚拟机就是一个普通文件,不需要了就删掉,对其他部分毫无影响。
... 2022-11-25T11:10:34.006+08:00 INFO 13537 --- [ main] com.itranswarp.learnjava.Application : No active profile set, falling back to 1 default profile: "default"
... 2022-11-25T11:09:02.946+08:00 INFO 13510 --- [ main] com.itranswarp.learnjava.Application : The following 1 profile is active: "test" ... 2022-11-25T11:09:05.124+08:00 INFO 13510 --- [ main] o.s.b.w.embedded.tomcat.TomcatWebServer : Tomcat started on port(s): 8000 (http) with context path '' ...
2022-11-25T10:49:31.100+08:00 INFO 13105 --- [ main] com.itranswarp.learnjava.Application : Starting Application using Java 17 with PID 13105 (/Users/liaoxuefeng/Git/springboot-hello/target/classes started by liaoxuefeng in /Users/liaoxuefeng/Git/springboot-hello) 2022-11-25T10:49:31.107+08:00 INFO 13105 --- [ main] com.itranswarp.learnjava.Application : No active profile set, falling back to 1 default profile: "default" 2022-11-25T10:49:32.404+08:00 INFO 13105 --- [ main] o.s.b.w.embedded.tomcat.TomcatWebServer : Tomcat initialized with port(s): 8080 (http) 2022-11-25T10:49:32.423+08:00 INFO 13105 --- [ main] o.apache.catalina.core.StandardService : Starting service [Tomcat] 2022-11-25T10:49:32.426+08:00 INFO 13105 --- [ main] o.apache.catalina.core.StandardEngine : Starting Servlet engine: [Apache Tomcat/10.1.1] 2022-11-25T10:49:32.549+08:00 INFO 13105 --- [ main] o.a.c.c.C.[Tomcat].[localhost].[/] : Initializing Spring embedded WebApplicationContext 2022-11-25T10:49:32.551+08:00 INFO 13105 --- [ main] w.s.c.ServletWebServerApplicationContext : Root WebApplicationContext: initialization completed in 1327 ms 2022-11-25T10:49:32.668+08:00 WARN 13105 --- [ main] com.zaxxer.hikari.HikariConfig : HikariPool-1 - idleTimeout is close to or more than maxLifetime, disabling it. 2022-11-25T10:49:32.669+08:00 INFO 13105 --- [ main] com.zaxxer.hikari.HikariDataSource : HikariPool-1 - Starting... 2022-11-25T10:49:32.996+08:00 INFO 13105 --- [ main] com.zaxxer.hikari.pool.PoolBase : HikariPool-1 - Driver does not support get/set network timeout for connections. (feature not supported) 2022-11-25T10:49:32.998+08:00 INFO 13105 --- [ main] com.zaxxer.hikari.pool.HikariPool : HikariPool-1 - Added connection org.hsqldb.jdbc.JDBCConnection@31a2a9fa 2022-11-25T10:49:33.002+08:00 INFO 13105 --- [ main] com.zaxxer.hikari.HikariDataSource : HikariPool-1 - Start completed. 2022-11-25T10:49:33.391+08:00 WARN 13105 --- [ main] ocalVariableTableParameterNameDiscoverer : Using deprecated '-debug' fallback for parameter name resolution. Compile the affected code with '-parameters' instead or avoid its introspection: io.pebbletemplates.boot.autoconfigure.PebbleServletWebConfiguration 2022-11-25T10:49:33.398+08:00 WARN 13105 --- [ main] ocalVariableTableParameterNameDiscoverer : Using deprecated '-debug' fallback for parameter name resolution. Compile the affected code with '-parameters' instead or avoid its introspection: io.pebbletemplates.boot.autoconfigure.PebbleAutoConfiguration 2022-11-25T10:49:33.619+08:00 INFO 13105 --- [ main] o.s.b.w.embedded.tomcat.TomcatWebServer : Tomcat started on port(s): 8080 (http) with context path '' 2022-11-25T10:49:33.637+08:00 INFO 13105 --- [ main] com.itranswarp.learnjava.Application : Started Application in 3.151 seconds (process running for 3.835)
Spring Boot自动启动了嵌入式Tomcat,当看到Started Application in xxx seconds时,Spring Boot应用启动成功。
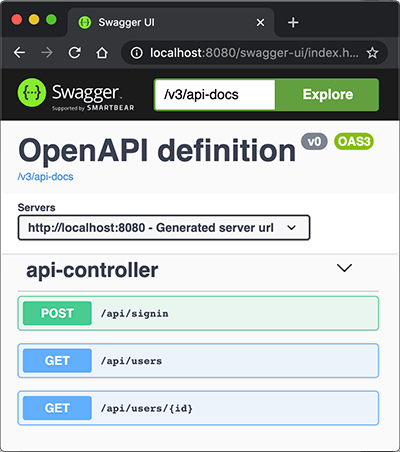
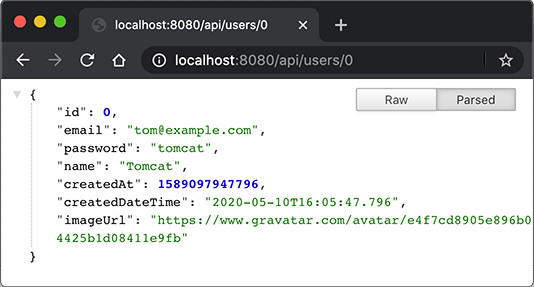
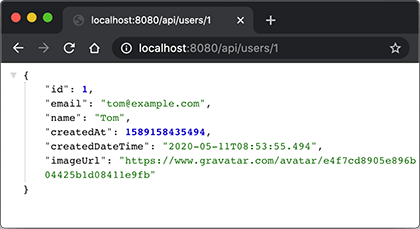
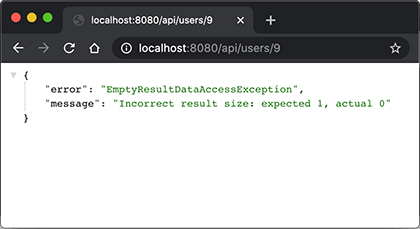
@RestController @RequestMapping("/api") publicclassApiController { ... @Operation(summary = "Get specific user object by it's id.") @GetMapping("/users/{id}") public User user(@Parameter(description = "id of the user.")@PathVariable("id")long id) { return userService.getUserById(id); } ... }
2020-06-02 07:50:21,718 INFO [org.apache.activemq.artemis] AMQ241001: HTTP Server started at http://localhost:8161 2020-06-02 07:50:21,718 INFO [org.apache.activemq.artemis] AMQ241002: Artemis Jolokia REST API available at http://localhost:8161/console/jolokia 2020-06-02 07:50:21,719 INFO [org.apache.activemq.artemis] AMQ241004: Artemis Console available at http://localhost:8161/console
2020-06-02 08:04:27 INFO c.i.learnjava.web.UserController - user registered: bob@example.com 2020-06-02 08:04:27 INFO c.i.l.service.MailMessageListener - received message: ActiveMQMessage[ID:9fc5...]:PERSISTENT/ClientMessageImpl[messageID=983, durable=true, address=jms/queue/mail, ...]] 2020-06-02 08:04:27 INFO c.i.learnjava.service.MailService - [send mail] sending registration mail to bob@example.com... 2020-06-02 08:04:30 INFO c.i.learnjava.service.MailService - [send mail] registration mail was sent to bob@example.com.
2020-06-03 18:47:32 INFO [pool-1-thread-1] c.i.learnjava.service.TaskService - Start check system status... 2020-06-03 18:48:32 INFO [pool-1-thread-1] c.i.learnjava.service.TaskService - Start check system status... 2020-06-03 18:49:32 INFO [pool-1-thread-1] c.i.learnjava.service.TaskService - Start check system status...
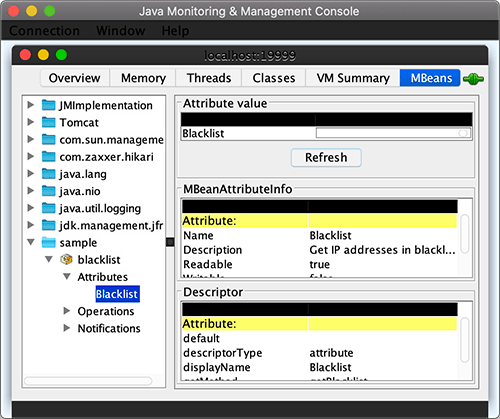
@Component @ManagedResource(objectName = "sample:name=blacklist", description = "Blacklist of IP addresses") publicclassBlacklistMBean { private Set<String> ips = newHashSet<>();
@ManagedAttribute(description = "Get IP addresses in blacklist") public String[] getBlacklist() { return ips.toArray(String[]::new); }
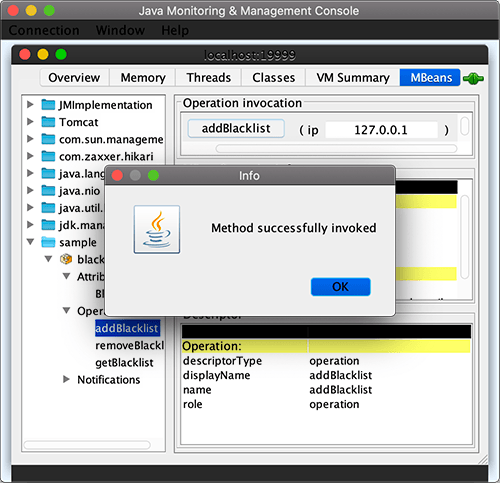
@ManagedOperation @ManagedOperationParameter(name = "ip", description = "Target IP address that will be added to blacklist") publicvoidaddBlacklist(String ip) { ips.add(ip); }
@ManagedOperation @ManagedOperationParameter(name = "ip", description = "Target IP address that will be removed from blacklist") publicvoidremoveBlacklist(String ip) { ips.remove(ip); }
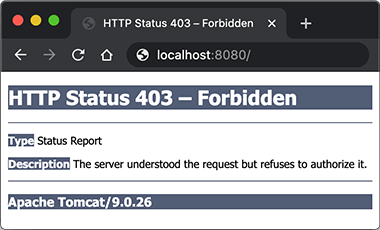
2020-06-06 20:22:12 INFO c.i.l.web.BlacklistInterceptor - check ip address 127.0.0.1... 2020-06-06 20:22:12 WARN c.i.l.web.BlacklistInterceptor - will block ip 127.0.0.1 for it is in blacklist.
2020-05-16 11:22:40 [http-nio-8080-exec-1] INFO c.i.learnjava.web.SyncFilter - start SyncFilter... 2020-05-16 11:22:40 [http-nio-8080-exec-1] INFO c.i.learnjava.web.AsyncFilter - start AsyncFilter... 2020-05-16 11:22:40 [http-nio-8080-exec-1] INFO c.i.learnjava.web.ApiController - get version... 2020-05-16 11:22:40 [http-nio-8080-exec-1] INFO c.i.learnjava.web.AsyncFilter - end AsyncFilter. 2020-05-16 11:22:40 [http-nio-8080-exec-1] INFO c.i.learnjava.web.SyncFilter - end SyncFilter.
可见,每个Filter和ApiController都是由同一个线程执行。
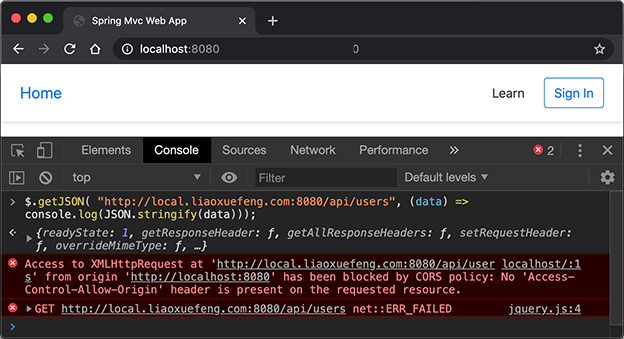
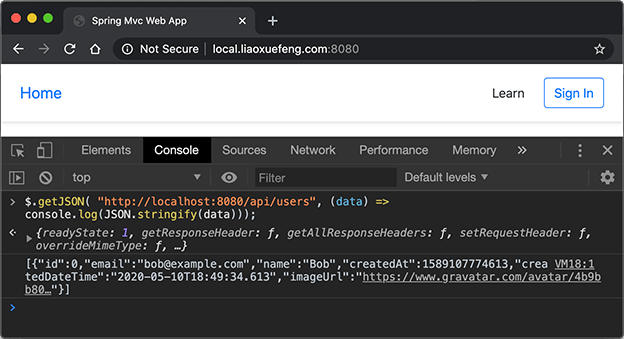
对于异步请求,例如/api/users,我们可以看到如下输出:
1
2
3
4
2020-05-16 11:23:49 [http-nio-8080-exec-4] INFO c.i.learnjava.web.AsyncFilter - start AsyncFilter... 2020-05-16 11:23:49 [http-nio-8080-exec-4] INFO c.i.learnjava.web.ApiController - get users... 2020-05-16 11:23:49 [http-nio-8080-exec-4] INFO c.i.learnjava.web.AsyncFilter - end AsyncFilter. 2020-05-16 11:23:52 [MvcAsync1] INFO c.i.learnjava.web.ApiController - return users...
2020-05-16 11:25:24 [http-nio-8080-exec-8] INFO c.i.learnjava.web.AsyncFilter - start AsyncFilter... 2020-05-16 11:25:24 [http-nio-8080-exec-8] INFO c.i.learnjava.web.AsyncFilter - end AsyncFilter. 2020-05-16 11:25:25 [Thread-2] INFO c.i.learnjava.web.ApiController - deferred result is set.