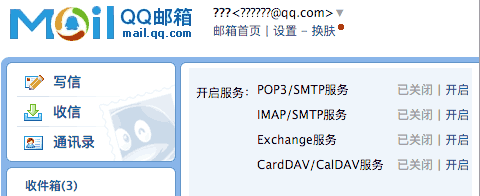
现在我们回到电子邮件,假设我们自己的电子邮件地址是me@163.com,对方的电子邮件地址是friend@sina.com(注意地址都是虚构的哈),现在我们用Outlook或者Foxmail之类的软件写好邮件,填上对方的Email地址,点“发送”,电子邮件就发出去了。这些电子邮件软件被称为MUA:Mail User Agent——邮件用户代理。
Email从MUA发出去,不是直接到达对方电脑,而是发到MTA:Mail Transfer Agent——邮件传输代理,就是那些Email服务提供商,比如网易、新浪等等。由于我们自己的电子邮件是163.com,所以,Email首先被投递到网易提供的MTA,再由网易的MTA发到对方服务商,也就是新浪的MTA。这个过程中间可能还会经过别的MTA,但是我们不关心具体路线,我们只关心速度。
+OK Welcome to coremail Mail Pop3 Server (163coms[...]) Messages: 126. Size: 27228317
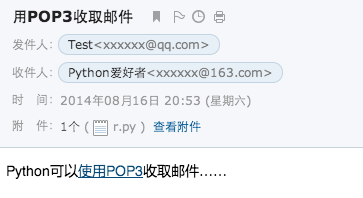
From: Test <xxxxxx@qq.com> To: Python爱好者 <xxxxxx@163.com> Subject: 用POP3收取邮件 part 0 -------------------- part 0 -------------------- Text: Python可以使用POP3收取邮件……... part 1 -------------------- Text: Python可以<a href="...">使用POP3</a>收取邮件……... part 1 -------------------- Attachment: application/octet-stream
s = socket.socket(socket.AF_INET, socket.SOCK_DGRAM) for data in [b'Michael', b'Tracy', b'Sarah']: # 发送数据: s.sendto(data, ('127.0.0.1', 9999)) # 接收数据: print(s.recv(1024).decode('utf-8')) s.close()
>>> r = requests.get('https://www.douban.com/', headers={'User-Agent': 'Mozilla/5.0 (iPhone; CPU iPhone OS 11_0 like Mac OS X) AppleWebKit'}) >>> r.text '<!DOCTYPE html>\n<html>\n<head>\n<meta charset="UTF-8">\n <title>豆瓣(手机版)</title>...'
在Python中获取系统信息的另一个好办法是使用psutil这个第三方模块。顾名思义,psutil = process and system utilities,它不仅可以通过一两行代码实现系统监控,还可以跨平台使用,支持Linux/UNIX/OSX/Windows等,是系统管理员和运维小伙伴不可或缺的必备模块。
# 构造命令行参数: parser = argparse.ArgumentParser() parser.add_argument('-u', '--user') parser.add_argument('-c', '--color') namespace = parser.parse_args() command_line_args = { k: v for k, v invars(namespace).items() if v }
optional arguments: -h, --help show this help message and exit --host HOST --port PORT -u USER, --user USER -p PASSWORD, --password PASSWORD --database DATABASE -gz, --gzcompress Compress backup files by gz.
举个例子,你写了一篇文章,内容是一个字符串'how to use python hashlib - by Michael',并附上这篇文章的哈希是'2d73d4f15c0db7f5ecb321b6a65e5d6d'。如果有人篡改了你的文章,并发表为'how to use python hashlib - by Bob',你可以一下子指出Bob篡改了你的文章,因为根据'how to use python hashlib - by Bob'计算出的哈希不同于原始文章的哈希。
sha1 = hashlib.sha1() sha1.update('how to use sha1 in '.encode('utf-8')) sha1.update('python hashlib?'.encode('utf-8')) print(sha1.hexdigest())
SHA1的结果是160 bit/20字节,通常用一个40位的16进制字符串表示。
比SHA1更安全的算法是SHA256和SHA512,不过越安全的算法不仅越慢,而且哈希长度更长。
有没有可能两个不同的数据通过某个哈希算法得到了相同的哈希?完全有可能,因为任何哈希算法都是把无限多的数据集合映射到一个有限的集合中。这种情况称为碰撞,比如Bob试图根据你的哈希反推出一篇文章'how to learn hashlib in python - by Bob',并且这篇文章的哈希恰好和你的文章完全一致,这种情况也并非不可能出现,但是非常非常困难。
>>> for c in itertools.chain('ABC', 'XYZ'): ... print(c) # 迭代效果:'A' 'B' 'C' 'X' 'Y' 'Z'
groupby()
groupby()把迭代器中相邻的重复元素挑出来放在一起:
1 2 3 4 5 6 7
>>> for key, group in itertools.groupby('AAABBBCCAAA'): ... print(key, list(group)) ... A ['A', 'A', 'A'] B ['B', 'B', 'B'] C ['C', 'C'] A ['A', 'A', 'A']
>>> for key, group in itertools.groupby('AaaBBbcCAAa', lambda c: c.upper()): ... print(key, list(group)) ... A ['A', 'a', 'a'] B ['B', 'B', 'b'] C ['c', 'C'] A ['A', 'A', 'a']
with request.urlopen('https://api.douban.com/v2/book/2129650') as f: data = f.read() print('Status:', f.status, f.reason) for k, v in f.getheaders(): print('%s: %s' % (k, v)) print('Data:', data.decode('utf-8'))
可以看到HTTP响应的头和JSON数据:
1 2 3 4 5 6 7 8 9 10 11
Status: 200 OK Server: nginx Date: Tue, 26 May 2015 10:02:27 GMT Content-Type: application/json; charset=utf-8 Content-Length: 2049 Connection: close Expires: Sun, 1 Jan 2006 01:00:00 GMT Pragma: no-cache Cache-Control: must-revalidate, no-cache, private X-DAE-Node: pidl1 Data: {"rating":{"max":10,"numRaters":16,"average":"7.4","min":0},"subtitle":"","author":["廖雪峰编著"],"pubdate":"2007-6",...}
req = request.Request('http://www.douban.com/') req.add_header('User-Agent', 'Mozilla/6.0 (iPhone; CPU iPhone OS 8_0 like Mac OS X) AppleWebKit/536.26 (KHTML, like Gecko) Version/8.0 Mobile/10A5376e Safari/8536.25') with request.urlopen(req) as f: print('Status:', f.status, f.reason) for k, v in f.getheaders(): print('%s: %s' % (k, v)) print('Data:', f.read().decode('utf-8'))
req = request.Request('https://passport.weibo.cn/sso/login') req.add_header('Origin', 'https://passport.weibo.cn') req.add_header('User-Agent', 'Mozilla/6.0 (iPhone; CPU iPhone OS 8_0 like Mac OS X) AppleWebKit/536.26 (KHTML, like Gecko) Version/8.0 Mobile/10A5376e Safari/8536.25') req.add_header('Referer', 'https://passport.weibo.cn/signin/login?entry=mweibo&res=wel&wm=3349&r=http%3A%2F%2Fm.weibo.cn%2F')
with request.urlopen(req, data=login_data.encode('utf-8')) as f: print('Status:', f.status, f.reason) for k, v in f.getheaders(): print('%s: %s' % (k, v)) print('Data:', f.read().decode('utf-8'))
print('Process (%s) start...' % os.getpid()) # Only works on Unix/Linux/macOS: pid = os.fork() if pid == 0: print('I am child process (%s) and my parent is %s.' % (os.getpid(), os.getppid())) else: print('I (%s) just created a child process (%s).' % (os.getpid(), pid))
运行结果如下:
1
2
3
Process (876) start... I (876) just created a child process (877). I am child process (877) and my parent is 876.
if __name__=='__main__': print('Parent process %s.' % os.getpid()) p = Process(target=run_proc, args=('test',)) print('Child process will start.') p.start() p.join() print('Child process end.')
执行结果如下:
1 2 3 4
Parent process 928. Child process will start. Run child process test (929)... Process end.
if __name__=='__main__': print('Parent process %s.' % os.getpid()) p = Pool(4) for i inrange(5): p.apply_async(long_time_task, args=(i,)) print('Waiting for all subprocesses done...') p.close() p.join() print('All subprocesses done.')
执行结果如下:
1 2 3 4 5 6 7 8 9 10 11 12 13
Parent process 669. Waiting for all subprocesses done... Run task 0 (671)... Run task 1 (672)... Run task 2 (673)... Run task 3 (674)... Task 2 runs 0.14 seconds. Run task 4 (673)... Task 1 runs 0.27 seconds. Task 3 runs 0.86 seconds. Task 0 runs 1.41 seconds. Task 4 runs 1.91 seconds. All subprocesses done.
from multiprocessing import Process, Queue import os, time, random
# 写数据进程执行的代码: defwrite(q): print('Process to write: %s' % os.getpid()) for value in ['A', 'B', 'C']: print('Put %s to queue...' % value) q.put(value) time.sleep(random.random())
# 读数据进程执行的代码: defread(q): print('Process to read: %s' % os.getpid()) whileTrue: value = q.get(True) print('Get %s from queue.' % value)
Process to write: 50563 Put A to queue... Process to read: 50564 Get A from queue. Put B to queue... Get B from queue. Put C to queue... Get C from queue.
# 连接到服务器,也就是运行task_master.py的机器: server_addr = '127.0.0.1' print('Connect to server %s...' % server_addr) # 端口和验证码注意保持与task_master.py设置的完全一致: m = QueueManager(address=(server_addr, 5000), authkey=b'abc') # 从网络连接: m.connect() # 获取Queue的对象: task = m.get_task_queue() result = m.get_result_queue() # 从task队列取任务,并把结果写入result队列: for i inrange(10): try: n = task.get(timeout=1) print('run task %d * %d...' % (n, n)) r = '%d * %d = %d' % (n, n, n*n) time.sleep(1) result.put(r) except Queue.Empty: print('task queue is empty.') # 处理结束: print('worker exit.')
任务进程要通过网络连接到服务进程,所以要指定服务进程的IP。
现在,可以试试分布式进程的工作效果了。先启动task_master.py服务进程:
1 2 3 4 5 6 7 8 9 10 11 12
$ python3 task_master.py Put task 3411... Put task 1605... Put task 1398... Put task 4729... Put task 5300... Put task 7471... Put task 68... Put task 4219... Put task 339... Put task 7866... Try get results...
$ python3 task_worker.py Connect to server 127.0.0.1... run task 3411 * 3411... run task 1605 * 1605... run task 1398 * 1398... run task 4729 * 4729... run task 5300 * 5300... run task 7471 * 7471... run task 68 * 68... run task 4219 * 4219... run task 339 * 339... run task 7866 * 7866... worker exit.
>>> f=open('/Users/michael/notfound.txt', 'r') Traceback (most recent call last): File "<stdin>", line 1, in <module> FileNotFoundError: [Errno 2] No such file or directory: '/Users/michael/notfound.txt'
>>> from io import StringIO >>> f = StringIO('Hello!\nHi!\nGoodbye!') >>> while True: ... s = f.readline() ... if s == '': ... break ... print(s.strip()) ... Hello! Hi! Goodbye!
>>> [x for x in os.listdir('.') if os.path.isdir(x)] ['.lein', '.local', '.m2', '.npm', '.ssh', '.Trash', '.vim', 'Applications', 'Desktop', ...]
要列出所有的.py文件,也只需一行代码:
1 2
>>> [x for x in os.listdir('.') if os.path.isfile(x) and os.path.splitext(x)[1]=='.py'] ['apis.py', 'config.py', 'models.py', 'pymonitor.py', 'test_db.py', 'urls.py', 'wsgiapp.py']
$ python3 err.py Traceback (most recent call last): File "err.py", line 11, in <module> main() File "err.py", line 9, in main bar('0') File "err.py", line 6, in bar return foo(s) * 2 File "err.py", line 3, in foo return 10 / int(s) ZeroDivisionError: division by zero
defmain(): try: bar('0') except Exception as e: logging.exception(e)
main() print('END')
同样是出错,但程序打印完错误信息后会继续执行,并正常退出:
1 2 3 4 5 6 7 8 9 10 11
$ python3 err_logging.py ERROR:root:division by zero Traceback (most recent call last): File "err_logging.py", line 13, in main bar('0') File "err_logging.py", line 9, in bar return foo(s) * 2 File "err_logging.py", line 6, in foo return 10 / int(s) ZeroDivisionError: division by zero END
$ python err.py > /Users/michael/Github/learn-python3/samples/debug/err.py(7)<module>() -> print(10 / n) (Pdb) p n 0 (Pdb) c Traceback (most recent call last): File "err.py", line 7, in <module> print(10 / n) ZeroDivisionError: division by zero
defset_score(self, value): ifnotisinstance(value, int): raise ValueError('score must be an integer!') if value < 0or value > 100: raise ValueError('score must between 0 ~ 100!') self._score = value
现在,对任意的Student实例进行操作,就不能随心所欲地设置score了:
1 2 3 4 5 6 7 8
>>> s = Student() >>> s.set_score(60) # ok! >>> s.get_score() 60 >>> s.set_score(9999) Traceback (most recent call last): ... ValueError: score must between 0 ~ 100!
@score.setter defscore(self, value): ifnotisinstance(value, int): raise ValueError('score must be an integer!') if value < 0or value > 100: raise ValueError('score must between 0 ~ 100!') self._score = value
classFib(object): def__getitem__(self, n): ifisinstance(n, int): # n是索引 a, b = 1, 1 for x inrange(n): a, b = b, a + b return a ifisinstance(n, slice): # n是切片 start = n.start stop = n.stop if start isNone: start = 0 a, b = 1, 1 L = [] for x inrange(stop): if x >= start: L.append(a) a, b = b, a + b return L
u = User(id=12345, name='Michael', email='test@orm.org', password='my-pwd') u.save()
输出如下:
1 2 3 4 5 6 7
Found model: User Found mapping: email ==> <StringField:email> Found mapping: password ==> <StringField:password> Found mapping: id ==> <IntegerField:uid> Found mapping: name ==> <StringField:username> SQL: insert into User (password,email,username,id) values (?,?,?,?) ARGS: ['my-pwd', 'test@orm.org', 'Michael', 12345]