使用Conditional
使用Profile能根据不同的Profile进行条件装配,但是Profile控制比较糙,如果想要精细控制,例如,配置本地存储,AWS存储和阿里云存储,将来很可能会增加Azure存储等,用Profile就很难实现。
Spring本身提供了条件装配@Conditional,但是要自己编写比较复杂的Condition来做判断,比较麻烦。Spring Boot则为我们准备好了几个非常有用的条件:
@ConditionalOnProperty:如果有指定的配置,条件生效;
@ConditionalOnBean:如果有指定的Bean,条件生效;
@ConditionalOnMissingBean:如果没有指定的Bean,条件生效;
@ConditionalOnMissingClass:如果没有指定的Class,条件生效;
@ConditionalOnWebApplication:在Web环境中条件生效;
@ConditionalOnExpression:根据表达式判断条件是否生效。
我们以最常用的@ConditionalOnProperty为例,把上一节的StorageService改写如下。首先,定义配置storage.type=xxx,用来判断条件,默认为local:
1
2
storage: type: ${STORAGE_TYPE:local}
设定为local时,启用LocalStorageService:
1
2
3
4
5
@Component @ConditionalOnProperty(value = "storage.type", havingValue = "local", matchIfMissing = true) public class LocalStorageService implements StorageService { ... }
设定为aws时,启用AwsStorageService:
1
2
3
4
5
@Component @ConditionalOnProperty(value = "storage.type", havingValue = "aws") public class AwsStorageService implements StorageService { ... }
设定为aliyun时,启用AliyunStorageService:
1
2
3
4
5
@Component @ConditionalOnProperty(value = "storage.type", havingValue = "aliyun") public class AliyunStorageService implements StorageService { ... }
注意到LocalStorageService的注解,当指定配置为local,或者配置不存在,均启用LocalStorageService。
可见,Spring Boot提供的条件装配使得应用程序更加具有灵活性。
练习
使用Spring Boot提供的条件装配。
下载练习
小结
Spring Boot提供了几个非常有用的条件装配注解,可实现灵活的条件装配。
Profile本身是Spring提供的功能,我们在使用条件装配 中已经讲到了,Profile表示一个环境的概念,如开发、测试和生产这3个环境:
或者按git分支定义master、dev这些环境:
在启动一个Spring应用程序的时候,可以传入一个或多个环境,例如:
1 -Dspring.profiles.active=test,master
大多数情况下,使用一个环境就足够了。
Spring Boot对Profiles的支持在于,可以在application.yml中为每个环境进行配置。下面是一个示例配置:
1
2
3
4
5
6
7
8
9
10
11
12
13
14
15
16
17
18
19
20
21
22
23
24
25
26
27
28
29
30
31
32
33
34
35
36
37
38
39
40
41
42
43
44
45
spring: application: name: ${APP_NAME:unnamed} datasource: url: jdbc:hsqldb:file:testdb username: sa password: dirver-class-name: org.hsqldb.jdbc.JDBCDriver hikari: auto-commit: false connection-timeout: 3000 validation-timeout: 3000 max-lifetime: 60000 maximum-pool-size: 20 minimum-idle: 1 pebble: suffix: cache: false server: port: ${APP_PORT:8080} --- spring: config: activate: on-profile: test server: port: 8000 --- spring: config: activate: on-profile: production server: port: 80 pebble: cache: true
注意到分隔符---,最前面的配置是默认配置,不需要指定Profile,后面的每段配置都必须以spring.config.activate.on-profile: xxx开头,表示一个Profile。上述配置默认使用8080端口,但是在test环境下,使用8000端口,在production环境下,使用80端口,并且启用Pebble的缓存。
如果我们不指定任何Profile,直接启动应用程序,那么Profile实际上就是default,可以从Spring Boot启动日志看出:
1
2
... 2022-11-25T11:10:34.006+08:00 INFO 13537 --- [ main] com.itranswarp.learnjava.Application : No active profile set, falling back to 1 default profile: "default"
上述日志显示未设置Profile,使用默认的Profile为default。
要以test环境启动,可输入如下命令:
1
2
3
4
5
6
7
$ java -Dspring.profiles.active=test -jar springboot-profiles-1.0-SNAPSHOT.jar ... 2022-11-25T11:09:02.946+08:00 INFO 13510 --- [ main] com.itranswarp.learnjava.Application : The following 1 profile is active: "test" ... 2022-11-25T11:09:05.124+08:00 INFO 13510 --- [ main] o.s.b.w.embedded.tomcat.TomcatWebServer : Tomcat started on port(s): 8000 (http) with context path '' ...
从日志看到活动的Profile是test,Tomcat的监听端口是8000。
通过Profile可以实现一套代码在不同环境启用不同的配置和功能。假设我们需要一个存储服务,在本地开发时,直接使用文件存储即可,但是,在测试和生产环境,需要存储到云端如S3上,如何通过Profile实现该功能?
首先,我们要定义存储接口StorageService:
1
2
3
4
5
6
7
8
public interface StorageService { InputStream openInputStream (String uri) throws IOException; String store (String extName, InputStream input) throws IOException; }
本地存储可通过LocalStorageService实现:
1
2
3
4
5
6
7
8
9
10
11
12
13
14
15
16
17
18
19
20
21
22
23
24
25
26
27
28
29
30
31
32
@Component @Profile("default") public class LocalStorageService implements StorageService { @Value("${storage.local:/var/static}") String localStorageRootDir; final Logger logger = LoggerFactory.getLogger(getClass()); private File localStorageRoot; @PostConstruct public void init () { logger.info("Intializing local storage with root dir: {}" , this .localStorageRootDir); this .localStorageRoot = new File (this .localStorageRootDir); } @Override public InputStream openInputStream (String uri) throws IOException { File targetFile = new File (this .localStorageRoot, uri); return new BufferedInputStream (new FileInputStream (targetFile)); } @Override public String store (String extName, InputStream input) throws IOException { String fileName = UUID.randomUUID().toString() + "." + extName; File targetFile = new File (this .localStorageRoot, fileName); try (OutputStream output = new BufferedOutputStream (new FileOutputStream (targetFile))) { input.transferTo(output); } return fileName; } }
而云端存储可通过CloudStorageService实现:
1
2
3
4
5
6
7
8
9
10
11
12
13
14
15
16
17
18
19
20
21
22
23
24
25
26
27
28
29
30
31
32
@Component @Profile("!default") public class CloudStorageService implements StorageService { @Value("${storage.cloud.bucket:}") String bucket; @Value("${storage.cloud.access-key:}") String accessKey; @Value("${storage.cloud.access-secret:}") String accessSecret; final Logger logger = LoggerFactory.getLogger(getClass()); @PostConstruct public void init () { logger.info("Initializing cloud storage..." ); } @Override public InputStream openInputStream (String uri) throws IOException { throw new IOException ("File not found: " + uri); } @Override public String store (String extName, InputStream input) throws IOException { throw new IOException ("Unable to access cloud storage." ); } }
注意到LocalStorageService使用了条件装配@Profile("default"),即默认启用LocalStorageService,而CloudStorageService使用了条件装配@Profile("!default"),即非default环境时,自动启用CloudStorageService。这样,一套代码,就实现了不同环境启用不同的配置。
练习
使用Profile启动Spring Boot应用。
下载练习
小结
Spring Boot允许在一个配置文件中针对不同Profile进行配置;
Spring Boot在未指定Profile时默认为default。
使用Actuator
在生产环境中,需要对应用程序的状态进行监控。前面我们已经介绍了使用JMX对Java应用程序包括JVM进行监控,使用JMX需要把一些监控信息以MBean的形式暴露给JMX Server,而Spring Boot已经内置了一个监控功能,它叫Actuator。
使用Actuator非常简单,只需添加如下依赖:
1 2 3 4 <dependency > <groupId > org.springframework.boot</groupId > <artifactId > spring-boot-starter-actuator</artifactId > </dependency >
然后正常启动应用程序,Actuator会把它能收集到的所有信息都暴露给JMX。此外,Actuator还可以通过URL/actuator/挂载一些监控点,例如,输入http://localhost:8080/actuator/health,我们可以查看应用程序当前状态:
许多网关作为反向代理需要一个URL来探测后端集群应用是否存活,这个URL就可以提供给网关使用。
Actuator默认把所有访问点暴露给JMX,但处于安全原因,只有health和info会暴露给Web。Actuator提供的所有访问点均在官方文档列出,要暴露更多的访问点给Web,需要在application.yml中加上配置:
1 2 3 4 5 management: endpoints: web: exposure: include: info, health, beans, env, metrics
要特别注意暴露的URL的安全性,例如,/actuator/env可以获取当前机器的所有环境变量,不可暴露给公网。
练习
使用Actuator实现监控。
下载练习
小结
Spring Boot提供了一个Actuator,可以方便地实现监控,并可通过Web访问特定类型的监控。
打包Spring Boot应用
我们在Maven的使用插件 一节中介绍了如何使用maven-shade-plugin打包一个可执行的jar包。在Spring Boot应用中,打包更加简单,因为Spring Boot自带一个更简单的spring-boot-maven-plugin插件用来打包,我们只需要在pom.xml中加入以下配置:
1 2 3 4 5 6 7 8 9 10 11 <project ... > ... <build > <plugins > <plugin > <groupId > org.springframework.boot</groupId > <artifactId > spring-boot-maven-plugin</artifactId > </plugin > </plugins > </build > </project >
无需任何配置,Spring Boot的这款插件会自动定位应用程序的入口Class,我们执行以下Maven命令即可打包:
以springboot-exec-jar项目为例,打包后我们在target目录下可以看到两个jar文件:
1 2 3 4 5 6 7 $ ls classes generated-sources maven-archiver maven-status springboot-exec-jar-1.0-SNAPSHOT.jar springboot-exec-jar-1.0-SNAPSHOT.jar.original
其中,springboot-exec-jar-1.0-SNAPSHOT.jar.original是Maven标准打包插件打的jar包,它只包含我们自己的Class,不包含依赖,而springboot-exec-jar-1.0-SNAPSHOT.jar是Spring Boot打包插件创建的包含依赖的jar,可以直接运行:
1 $ java -jar springboot-exec-jar-1.0-SNAPSHOT.jar
这样,部署一个Spring Boot应用就非常简单,无需预装任何服务器,只需要上传jar包即可。
在打包的时候,因为打包后的Spring Boot应用不会被修改,因此,默认情况下,spring-boot-devtools这个依赖不会被打包进去。但是要注意,使用早期的Spring Boot版本时,需要配置一下才能排除spring-boot-devtools这个依赖:
1 2 3 4 5 6 7 <plugin > <groupId > org.springframework.boot</groupId > <artifactId > spring-boot-maven-plugin</artifactId > <configuration > <excludeDevtools > true</excludeDevtools > </configuration > </plugin >
如果不喜欢默认的项目名+版本号作为文件名,可以加一个配置指定文件名:
1 2 3 4 5 6 7 <project ... > ... <build > <finalName > awesome-app</finalName > ... </build > </project >
这样打包后的文件名就是awesome-app.jar。
练习
使用Spring Boot插件打包可执行jar。
下载练习
小结
Spring Boot提供了一个Maven插件用于打包所有依赖到单一jar文件,此插件十分易用,无需配置。
在开发阶段,我们经常要修改代码,然后重启Spring Boot应用。经常手动停止再启动,比较麻烦。
Spring Boot提供了一个开发者工具,可以监控classpath路径上的文件。只要源码或配置文件发生修改,Spring Boot应用可以自动重启。在开发阶段,这个功能比较有用。
要使用这一开发者功能,我们只需添加如下依赖到pom.xml:
1 2 3 4 <dependency > <groupId > org.springframework.boot</groupId > <artifactId > spring-boot-devtools</artifactId > </dependency >
然后,没有然后了。直接启动应用程序,然后试着修改源码,保存,观察日志输出,Spring Boot会自动重新加载。
默认配置下,针对/static、/public和/templates目录中的文件修改,不会自动重启,因为禁用缓存后,这些文件的修改可以实时更新。
练习
使用devtools检测修改并自动重启。
下载练习
小结
Spring Boot提供了一个开发阶段非常有用的spring-boot-devtools,能自动检测classpath路径上文件修改并自动重启。
要了解Spring Boot,我们先来编写第一个Spring Boot应用程序,看看与前面我们编写的Spring应用程序有何异同。
我们新建一个springboot-hello的工程,创建标准的Maven目录结构如下:
1 2 3 4 5 6 7 8 9 10 11 springboot-hello ├── pom.xml ├── src │ └── main │ ├── java │ └── resources │ ├── application.yml │ ├── logback-spring.xml │ ├── static │ └── templates └── target
其中,在src/main/resources目录下,注意到几个文件:
application.yml
这是Spring Boot默认的配置文件,它采用YAML 格式而不是.properties格式,文件名必须是application.yml而不是其他名称。
YAML格式比key=value格式的.properties文件更易读。比较一下两者的写法:
使用.properties格式:
1 2 3 4 5 6 7 8 9 10 11 12 13 14 15 spring.application.name =${APP_NAME:unnamed} spring.datasource.url =jdbc:hsqldb:file:testdb spring.datasource.username =sa spring.datasource.password =spring.datasource.driver-class-name =org.hsqldb.jdbc.JDBCDriver spring.datasource.hikari.auto-commit =false spring.datasource.hikari.connection-timeout =3000 spring.datasource.hikari.validation-timeout =3000 spring.datasource.hikari.max-lifetime =60000 spring.datasource.hikari.maximum-pool-size =20 spring.datasource.hikari.minimum-idle =1
使用YAML格式:
1 2 3 4 5 6 7 8 9 10 11 12 13 14 15 16 17 spring: application: name: ${APP_NAME:unnamed} datasource: url: jdbc:hsqldb:file:testdb username: sa password: driver-class-name: org.hsqldb.jdbc.JDBCDriver hikari: auto-commit: false connection-timeout: 3000 validation-timeout: 3000 max-lifetime: 60000 maximum-pool-size: 20 minimum-idle: 1
可见,YAML是一种层级格式,它和.properties很容易互相转换,它的优点是去掉了大量重复的前缀,并且更加易读。
提示
也可以使用application.properties作为配置文件,但不如YAML格式简单。
使用环境变量
在配置文件中,我们经常使用如下的格式对某个key进行配置:
1 2 3 4 5 app: db: host: ${DB_HOST:localhost} user: ${DB_USER:root} password: ${DB_PASSWORD:password}
这种${DB_HOST:localhost}意思是,首先从环境变量查找DB_HOST,如果环境变量定义了,那么使用环境变量的值,否则,使用默认值localhost。
这使得我们在开发和部署时更加方便,因为开发时无需设定任何环境变量,直接使用默认值即本地数据库,而实际线上运行的时候,只需要传入环境变量即可:
1 $ DB_HOST=10.0.1.123 DB_USER=prod DB_PASSWORD=xxxx java -jar xxx.jar
logback-spring.xml
这是Spring Boot的logback配置文件名称(也可以使用logback.xml),一个标准的写法如下:
1 2 3 4 5 6 7 8 9 10 11 12 13 14 15 16 17 18 19 20 21 22 23 24 25 26 27 28 29 30 31 <?xml version="1.0" encoding="UTF-8" ?> <configuration > <include resource ="org/springframework/boot/logging/logback/defaults.xml" /> <appender name ="CONSOLE" class ="ch.qos.logback.core.ConsoleAppender" > <encoder > <pattern > ${CONSOLE_LOG_PATTERN}</pattern > <charset > utf8</charset > </encoder > </appender > <appender name ="APP_LOG" class ="ch.qos.logback.core.rolling.RollingFileAppender" > <encoder > <pattern > ${FILE_LOG_PATTERN}</pattern > <charset > utf8</charset > </encoder > <file > app.log</file > <rollingPolicy class ="ch.qos.logback.core.rolling.FixedWindowRollingPolicy" > <maxIndex > 1</maxIndex > <fileNamePattern > app.log.%i</fileNamePattern > </rollingPolicy > <triggeringPolicy class ="ch.qos.logback.core.rolling.SizeBasedTriggeringPolicy" > <MaxFileSize > 1MB</MaxFileSize > </triggeringPolicy > </appender > <root level ="INFO" > <appender-ref ref ="CONSOLE" /> <appender-ref ref ="APP_LOG" /> </root > </configuration >
它主要通过<include resource="..." />引入了Spring Boot的一个缺省配置,这样我们就可以引用类似${CONSOLE_LOG_PATTERN}这样的变量。上述配置定义了一个控制台输出和文件输出,可根据需要修改。
static是静态文件目录,templates是模板文件目录,注意它们不再存放在src/main/webapp下,而是直接放到src/main/resources这个classpath目录,因为在Spring Boot中已经不需要专门的webapp目录了。
以上就是Spring Boot的标准目录结构,它完全是一个基于Java应用的普通Maven项目。
我们再来看源码目录结构:
1 2 3 4 5 6 7 8 9 10 11 src/main/java └── com └── itranswarp └── learnjava ├── Application.java ├── entity │ └── User.java ├── service │ └── UserService.java └── web └── UserController.java
在存放源码的src/main/java目录中,Spring Boot对Java包的层级结构有一个要求。注意到我们的根package是com.itranswarp.learnjava,下面还有entity、service、web等子package。Spring Boot要求main()方法所在的启动类必须放到根package下,命名不做要求,这里我们以Application.java命名,它的内容如下:
1 2 3 4 5 6 @SpringBootApplication public class Application { public static void main (String[] args) throws Exception { SpringApplication.run(Application.class, args); } }
启动Spring Boot应用程序只需要一行代码加上一个注解@SpringBootApplication,该注解实际上又包含了:
@SpringBootConfiguration
@EnableAutoConfiguration
@AutoConfigurationPackage
@ComponentScan
这样一个注解就相当于启动了自动配置和自动扫描。
我们再观察pom.xml,它的内容如下:
1 2 3 4 5 6 7 8 9 10 11 12 13 14 15 16 17 18 19 20 21 22 23 24 25 26 27 28 29 30 31 32 33 34 35 36 37 38 39 40 41 42 43 44 <project ... > <parent > <groupId > org.springframework.boot</groupId > <artifactId > spring-boot-starter-parent</artifactId > <version > 3.0.0</version > </parent > <modelVersion > 4.0.0</modelVersion > <groupId > com.itranswarp.learnjava</groupId > <artifactId > springboot-hello</artifactId > <version > 1.0-SNAPSHOT</version > <properties > <maven.compiler.source > 17</maven.compiler.source > <maven.compiler.target > 17</maven.compiler.target > <java.version > 17</java.version > <pebble.version > 3.2.0</pebble.version > </properties > <dependencies > <dependency > <groupId > org.springframework.boot</groupId > <artifactId > spring-boot-starter-web</artifactId > </dependency > <dependency > <groupId > org.springframework.boot</groupId > <artifactId > spring-boot-starter-jdbc</artifactId > </dependency > <dependency > <groupId > io.pebbletemplates</groupId > <artifactId > pebble-spring-boot-starter</artifactId > <version > ${pebble.version}</version > </dependency > <dependency > <groupId > org.hsqldb</groupId > <artifactId > hsqldb</artifactId > </dependency > </dependencies > </project >
使用Spring Boot时,强烈推荐从spring-boot-starter-parent继承,因为这样就可以引入Spring Boot的预置配置。
紧接着,我们引入了依赖spring-boot-starter-web和spring-boot-starter-jdbc,它们分别引入了Spring MVC相关依赖和Spring JDBC相关依赖,无需指定版本号,因为引入的<parent>内已经指定了,只有我们自己引入的某些第三方jar包需要指定版本号。这里我们引入pebble-spring-boot-starter作为View,以及hsqldb作为嵌入式数据库。hsqldb已在spring-boot-starter-jdbc中预置了版本号3.0.0,因此此处无需指定版本号。
根据pebble-spring-boot-starter的文档 ,加入如下配置到application.yml:
1 2 3 4 5 pebble: suffix: cache: false
对Application稍作改动,添加WebMvcConfigurer这个Bean:
1 2 3 4 5 6 7 8 9 10 11 12 13 14 15 16 @SpringBootApplication public class Application { ... @Bean WebMvcConfigurer createWebMvcConfigurer (@Autowired HandlerInterceptor[] interceptors) { return new WebMvcConfigurer () { @Override public void addResourceHandlers (ResourceHandlerRegistry registry) { registry.addResourceHandler("/static/**" ) .addResourceLocations("classpath:/static/" ); } }; } }
现在就可以直接运行Application,启动后观察Spring Boot的日志:
1 2 3 4 5 6 7 8 9 10 11 12 13 14 15 16 17 18 19 20 21 22 23 24 . ____ _ __ _ _ /\\ / ___'_ __ _ _(_)_ __ __ _ \ \ \ \ ( ( )\___ | '_ | '_| | '_ \/ _` | \ \ \ \ \\/ ___)| |_)| | | | | || (_| | ) ) ) ) ' |____| .__|_| |_|_| |_\__, | / / / / =========|_|==============|___/=/_/_/_/ :: Spring Boot :: (v3.0.0) 2022-11-25T10:49:31.100+08:00 INFO 13105 --- [ main] com.itranswarp.learnjava.Application : Starting Application using Java 17 with PID 13105 (/Users/liaoxuefeng/Git/springboot-hello/target/classes started by liaoxuefeng in /Users/liaoxuefeng/Git/springboot-hello) 2022-11-25T10:49:31.107+08:00 INFO 13105 --- [ main] com.itranswarp.learnjava.Application : No active profile set, falling back to 1 default profile: "default" 2022-11-25T10:49:32.404+08:00 INFO 13105 --- [ main] o.s.b.w.embedded.tomcat.TomcatWebServer : Tomcat initialized with port(s): 8080 (http) 2022-11-25T10:49:32.423+08:00 INFO 13105 --- [ main] o.apache.catalina.core.StandardService : Starting service [Tomcat] 2022-11-25T10:49:32.426+08:00 INFO 13105 --- [ main] o.apache.catalina.core.StandardEngine : Starting Servlet engine: [Apache Tomcat/10.1.1] 2022-11-25T10:49:32.549+08:00 INFO 13105 --- [ main] o.a.c.c.C.[Tomcat].[localhost].[/] : Initializing Spring embedded WebApplicationContext 2022-11-25T10:49:32.551+08:00 INFO 13105 --- [ main] w.s.c.ServletWebServerApplicationContext : Root WebApplicationContext: initialization completed in 1327 ms 2022-11-25T10:49:32.668+08:00 WARN 13105 --- [ main] com.zaxxer.hikari.HikariConfig : HikariPool-1 - idleTimeout is close to or more than maxLifetime, disabling it. 2022-11-25T10:49:32.669+08:00 INFO 13105 --- [ main] com.zaxxer.hikari.HikariDataSource : HikariPool-1 - Starting... 2022-11-25T10:49:32.996+08:00 INFO 13105 --- [ main] com.zaxxer.hikari.pool.PoolBase : HikariPool-1 - Driver does not support get/set network timeout for connections. (feature not supported) 2022-11-25T10:49:32.998+08:00 INFO 13105 --- [ main] com.zaxxer.hikari.pool.HikariPool : HikariPool-1 - Added connection org.hsqldb.jdbc.JDBCConnection@31a2a9fa 2022-11-25T10:49:33.002+08:00 INFO 13105 --- [ main] com.zaxxer.hikari.HikariDataSource : HikariPool-1 - Start completed. 2022-11-25T10:49:33.391+08:00 WARN 13105 --- [ main] ocalVariableTableParameterNameDiscoverer : Using deprecated '-debug' fallback for parameter name resolution. Compile the affected code with '-parameters' instead or avoid its introspection: io.pebbletemplates.boot.autoconfigure.PebbleServletWebConfiguration 2022-11-25T10:49:33.398+08:00 WARN 13105 --- [ main] ocalVariableTableParameterNameDiscoverer : Using deprecated '-debug' fallback for parameter name resolution. Compile the affected code with '-parameters' instead or avoid its introspection: io.pebbletemplates.boot.autoconfigure.PebbleAutoConfiguration 2022-11-25T10:49:33.619+08:00 INFO 13105 --- [ main] o.s.b.w.embedded.tomcat.TomcatWebServer : Tomcat started on port(s): 8080 (http) with context path '' 2022-11-25T10:49:33.637+08:00 INFO 13105 --- [ main] com.itranswarp.learnjava.Application : Started Application in 3.151 seconds (process running for 3.835)
Spring Boot自动启动了嵌入式Tomcat,当看到Started Application in xxx seconds时,Spring Boot应用启动成功。
现在,我们在浏览器输入localhost:8080就可以直接访问页面。那么问题来了:
前面我们定义的数据源、声明式事务、JdbcTemplate在哪创建的?怎么就可以直接注入到自己编写的UserService中呢?
这些自动创建的Bean就是Spring Boot的特色:AutoConfiguration。
当我们引入spring-boot-starter-jdbc时,启动时会自动扫描所有的XxxAutoConfiguration:
DataSourceAutoConfiguration:自动创建一个DataSource,其中配置项从application.yml的spring.datasource读取;DataSourceTransactionManagerAutoConfiguration:自动创建了一个基于JDBC的事务管理器;JdbcTemplateAutoConfiguration:自动创建了一个JdbcTemplate。
因此,我们自动得到了一个DataSource、一个DataSourceTransactionManager和一个JdbcTemplate。
类似的,当我们引入spring-boot-starter-web时,自动创建了:
ServletWebServerFactoryAutoConfiguration:自动创建一个嵌入式Web服务器,默认是Tomcat;DispatcherServletAutoConfiguration:自动创建一个DispatcherServlet;HttpEncodingAutoConfiguration:自动创建一个CharacterEncodingFilter;WebMvcAutoConfiguration:自动创建若干与MVC相关的Bean。…
引入第三方pebble-spring-boot-starter时,自动创建了:
PebbleAutoConfiguration:自动创建了一个PebbleViewResolver。
Spring Boot大量使用XxxAutoConfiguration来使得许多组件被自动化配置并创建,而这些创建过程又大量使用了Spring的Conditional功能。例如,我们观察JdbcTemplateAutoConfiguration,它的代码如下:
1 2 3 4 5 6 7 8 @Configuration(proxyBeanMethods = false) @ConditionalOnClass({ DataSource.class, JdbcTemplate.class }) @ConditionalOnSingleCandidate(DataSource.class) @AutoConfigureAfter(DataSourceAutoConfiguration.class) @EnableConfigurationProperties(JdbcProperties.class) @Import({ JdbcTemplateConfiguration.class, NamedParameterJdbcTemplateConfiguration.class }) public class JdbcTemplateAutoConfiguration {}
当满足条件:
@ConditionalOnClass:在classpath中能找到DataSource和JdbcTemplate;@ConditionalOnSingleCandidate(DataSource.class):在当前Bean的定义中能找到唯一的DataSource;
该JdbcTemplateAutoConfiguration就会起作用。实际创建由导入的JdbcTemplateConfiguration完成:
1 2 3 4 5 6 7 8 9 10 11 12 13 14 15 16 @Configuration(proxyBeanMethods = false) @ConditionalOnMissingBean(JdbcOperations.class) class JdbcTemplateConfiguration { @Bean @Primary JdbcTemplate jdbcTemplate (DataSource dataSource, JdbcProperties properties) { JdbcTemplate jdbcTemplate = new JdbcTemplate (dataSource); JdbcProperties.Template template = properties.getTemplate(); jdbcTemplate.setFetchSize(template.getFetchSize()); jdbcTemplate.setMaxRows(template.getMaxRows()); if (template.getQueryTimeout() != null ) { jdbcTemplate.setQueryTimeout((int ) template.getQueryTimeout().getSeconds()); } return jdbcTemplate; } }
创建JdbcTemplate之前,要满足@ConditionalOnMissingBean(JdbcOperations.class),即不存在JdbcOperations的Bean。
如果我们自己创建了一个JdbcTemplate,例如,在Application中自己写个方法:
1 2 3 4 5 6 7 8 @SpringBootApplication public class Application { ... @Bean JdbcTemplate createJdbcTemplate (@Autowired DataSource dataSource) { return new JdbcTemplate (dataSource); } }
那么根据条件@ConditionalOnMissingBean(JdbcOperations.class),Spring Boot就不会再创建一个重复的JdbcTemplate(因为JdbcOperations是JdbcTemplate的父类)。
可见,Spring Boot自动装配功能是通过自动扫描+条件装配实现的,这一套机制在默认情况下工作得很好,但是,如果我们要手动控制某个Bean的创建,就需要详细地了解Spring Boot自动创建的原理,很多时候还要跟踪XxxAutoConfiguration,以便设定条件使得某个Bean不会被自动创建。
练习
使用Spring Boot编写hello应用程序。
下载练习
小结
Spring Boot是一个基于Spring提供了开箱即用的一组套件,它可以让我们基于很少的配置和代码快速搭建出一个完整的应用程序。
Spring Boot有非常强大的AutoConfiguration功能,它是通过自动扫描+条件装配实现的。
Spring Boot开发
我们已经在前面详细介绍了Spring框架,它的主要功能包括IoC容器、AOP支持、事务支持、MVC开发以及强大的第三方集成功能等。
那么,Spring Boot又是什么?它和Spring是什么关系?
Spring Boot是一个基于Spring的套件,它帮我们预组装了Spring的一系列组件,以便以尽可能少的代码和配置来开发基于Spring的Java应用程序。
以汽车为例,如果我们想组装一辆汽车,我们需要发动机、传动、轮胎、底盘、外壳、座椅、内饰等各种部件,然后把它们装配起来。Spring就相当于提供了一系列这样的部件,但是要装好汽车上路,还需要我们自己动手。而Spring Boot则相当于已经帮我们预装好了一辆可以上路的汽车,如果有特殊的要求,例如把发动机从普通款换成涡轮增压款,可以通过修改配置或编写少量代码完成。
因此,Spring Boot和Spring的关系就是整车和零部件的关系,它们不是取代关系,试图跳过Spring直接学习Spring Boot是不可能的。
Spring Boot的目标就是提供一个开箱即用的应用程序架构,我们基于Spring Boot的预置结构继续开发,省时省力。
本章我们将详细介绍如何使用Spring Boot。
本教程使用的Spring Boot版本是3.x版,如果使用Spring Boot 2.x则需注意,两者有以下不同:
Spring Boot 2.x
Spring Boot 3.x
Spring版本
Spring 5.x
Spring 6.x
JDK版本
>= 1.8
>= 17
Tomcat版本
9.x
10.x
Annotation包
javax.annotation
jakarta.annotation
Servlet包
javax.servlet
jakarta.servlet
JMS包
javax.jms
jakarta.jms
JavaMail包
javax.mail
jakarta.mail
如果使用Spring Boot的其他版本,则需要根据需要调整代码。
Spring Boot的官网入口是这里 ,建议添加到浏览器收藏夹。
加载配置文件
加载配置文件可以直接使用注解@Value,例如,我们定义了一个最大允许上传的文件大小配置:
1 2 3 storage: local: max-size: 102400
在某个FileUploader里,需要获取该配置,可使用@Value注入:
1 2 3 4 5 6 7 @Component public class FileUploader { @Value("${storage.local.max-size:102400}") int maxSize; ... }
在另一个UploadFilter中,因为要检查文件的MD5,同时也要检查输入流的大小,因此,也需要该配置:
1 2 3 4 5 6 7 @Component public class UploadFilter implements Filter { @Value("${storage.local.max-size:100000}") int maxSize; ... }
多次引用同一个@Value不但麻烦,而且@Value使用字符串,缺少编译器检查,容易造成多处引用不一致(例如,UploadFilter把缺省值误写为100000)。
为了更好地管理配置,Spring Boot允许创建一个Bean,持有一组配置,并由Spring Boot自动注入。
假设我们在application.yml中添加了如下配置:
1 2 3 4 5 6 7 8 9 10 storage: local: root-dir: ${STORAGE_LOCAL_ROOT:/var/storage} max-size: ${STORAGE_LOCAL_MAX_SIZE:102400} allow-empty: false allow-types: jpg, png, gif
可以首先定义一个Java Bean,持有该组配置:
1 2 3 4 5 6 7 8 9 public class StorageConfiguration { private String rootDir; private int maxSize; private boolean allowEmpty; private List<String> allowTypes; }
保证Java Bean的属性名称与配置一致即可。然后,我们添加两个注解:
1 2 3 4 5 @Configuration @ConfigurationProperties("storage.local") public class StorageConfiguration { ... }
注意到@ConfigurationProperties("storage.local")表示将从配置项storage.local读取该项的所有子项配置,并且,@Configuration表示StorageConfiguration也是一个Spring管理的Bean,可直接注入到其他Bean中:
1 2 3 4 5 6 7 8 9 10 11 12 13 14 @Component public class StorageService { final Logger logger = LoggerFactory.getLogger(getClass()); @Autowired StorageConfiguration storageConfig; @PostConstruct public void init () { logger.info("Load configuration: root-dir = {}" , storageConfig.getRootDir()); logger.info("Load configuration: max-size = {}" , storageConfig.getMaxSize()); logger.info("Load configuration: allowed-types = {}" , storageConfig.getAllowTypes()); } }
这样一来,引入storage.local的相关配置就很容易了,因为只需要注入StorageConfiguration这个Bean,这样可以由编译器检查类型,无需编写重复的@Value注解。
练习
用Spring Boot加载配置文件。
下载练习
小结
Spring Boot提供了@ConfigurationProperties注解,可以非常方便地把一段配置加载到一个Bean中。
Spring Boot大量使用自动配置和默认配置,极大地减少了代码,通常只需要加上几个注解,并按照默认规则设定一下必要的配置即可。例如,配置JDBC,默认情况下,只需要配置一个spring.datasource:
1 2 3 4 5 6 spring: datasource: url: jdbc:hsqldb:file:testdb username: sa password: dirver-class-name: org.hsqldb.jdbc.JDBCDriver
Spring Boot就会自动创建出DataSource、JdbcTemplate、DataSourceTransactionManager,非常方便。
但是,有时候,我们又必须要禁用某些自动配置。例如,系统有主从两个数据库,而Spring Boot的自动配置只能配一个,怎么办?
这个时候,针对DataSource相关的自动配置,就必须关掉。我们需要用exclude指定需要关掉的自动配置:
1 2 3 4 5 6 @SpringBootApplication @EnableAutoConfiguration(exclude = DataSourceAutoConfiguration.class) public class Application { ... }
现在,Spring Boot不再给我们自动创建DataSource、JdbcTemplate和DataSourceTransactionManager了,要实现主从数据库支持,怎么办?
让我们一步一步开始编写支持主从数据库的功能。首先,我们需要把主从数据库配置写到application.yml中,仍然按照Spring Boot默认的格式写,但datasource改为datasource-master和datasource-slave:
1 2 3 4 5 6 7 8 9 10 11 spring: datasource-master: url: jdbc:hsqldb:file:testdb username: sa password: dirver-class-name: org.hsqldb.jdbc.JDBCDriver datasource-slave: url: jdbc:hsqldb:file:testdb username: sa password: dirver-class-name: org.hsqldb.jdbc.JDBCDriver
注意到两个数据库实际上是同一个库。如果使用MySQL,可以创建一个只读用户,作为datasource-slave的用户来模拟一个从库。
下一步,我们分别创建两个HikariCP的DataSource:
1 2 3 4 5 6 7 8 9 10 11 12 13 14 15 16 17 18 19 20 21 22 23 24 25 public class MasterDataSourceConfiguration { @Bean("masterDataSourceProperties") @ConfigurationProperties("spring.datasource-master") DataSourceProperties dataSourceProperties () { return new DataSourceProperties (); } @Bean("masterDataSource") DataSource dataSource (@Autowired @Qualifier("masterDataSourceProperties") DataSourceProperties props) { return props.initializeDataSourceBuilder().build(); } } public class SlaveDataSourceConfiguration { @Bean("slaveDataSourceProperties") @ConfigurationProperties("spring.datasource-slave") DataSourceProperties dataSourceProperties () { return new DataSourceProperties (); } @Bean("slaveDataSource") DataSource dataSource (@Autowired @Qualifier("slaveDataSourceProperties") DataSourceProperties props) { return props.initializeDataSourceBuilder().build(); } }
注意到上述class并未添加@Configuration和@Component,要使之生效,可以使用@Import导入:
1 2 3 4 5 6 @SpringBootApplication @EnableAutoConfiguration(exclude = DataSourceAutoConfiguration.class) @Import({ MasterDataSourceConfiguration.class, SlaveDataSourceConfiguration.class}) public class Application { ... }
此外,上述两个DataSource的Bean名称分别为masterDataSource和slaveDataSource,我们还需要一个最终的@Primary标注的DataSource,它采用Spring提供的AbstractRoutingDataSource,代码实现如下:
1 2 3 4 5 6 7 class RoutingDataSource extends AbstractRoutingDataSource { @Override protected Object determineCurrentLookupKey () { return RoutingDataSourceContext.getDataSourceRoutingKey(); } }
RoutingDataSource本身并不是真正的DataSource,它通过Map关联一组DataSource,下面的代码创建了包含两个DataSource的RoutingDataSource,关联的key分别为masterDataSource和slaveDataSource:
1 2 3 4 5 6 7 8 9 10 11 12 13 14 15 16 17 18 19 20 21 22 23 24 25 26 public class RoutingDataSourceConfiguration { @Primary @Bean DataSource dataSource ( @Autowired @Qualifier("masterDataSource") DataSource masterDataSource, @Autowired @Qualifier("slaveDataSource") DataSource slaveDataSource) { var ds = new RoutingDataSource (); ds.setTargetDataSources(Map.of( "masterDataSource" , masterDataSource, "slaveDataSource" , slaveDataSource)); ds.setDefaultTargetDataSource(masterDataSource); return ds; } @Bean JdbcTemplate jdbcTemplate (@Autowired DataSource dataSource) { return new JdbcTemplate (dataSource); } @Bean DataSourceTransactionManager dataSourceTransactionManager (@Autowired DataSource dataSource) { return new DataSourceTransactionManager (dataSource); } }
仍然需要自己创建JdbcTemplate和PlatformTransactionManager,注入的是标记为@Primary的RoutingDataSource。
这样,我们通过如下的代码就可以切换RoutingDataSource底层使用的真正的DataSource:
1 2 RoutingDataSourceContext.setDataSourceRoutingKey("slaveDataSource" ); jdbcTemplate.query(...);
只不过写代码切换DataSource即麻烦又容易出错,更好的方式是通过注解配合AOP实现自动切换,这样,客户端代码实现如下:
1 2 3 4 5 6 7 8 @Controller public class UserController { @RoutingWithSlave @GetMapping("/profile") public ModelAndView profile (HttpSession session) { ... } }
实现上述功能需要编写一个@RoutingWithSlave注解,一个AOP织入和一个ThreadLocal来保存key。由于代码比较简单,这里我们不再详述。
如果我们想要确认是否真的切换了DataSource,可以覆写determineTargetDataSource()方法并打印出DataSource的名称:
1 2 3 4 5 6 7 8 9 10 class RoutingDataSource extends AbstractRoutingDataSource { ... @Override protected DataSource determineTargetDataSource () { DataSource ds = super .determineTargetDataSource(); logger.info("determin target datasource: {}" , ds); return ds; } }
访问不同的URL,可以在日志中看到两个DataSource,分别是HikariPool-1和hikariPool-2:
1 2 2020-06-14 17:55:21.676 INFO 91561 --- [nio-8080-exec-7] c.i.learnjava.config.RoutingDataSource : determin target datasource: HikariDataSource (HikariPool-1) 2020-06-14 17:57:08.992 INFO 91561 --- [io-8080-exec-10] c.i.learnjava.config.RoutingDataSource : determin target datasource: HikariDataSource (HikariPool-2)
我们用一个图来表示创建的DataSource以及相关Bean的关系:
1 2 3 4 5 6 7 8 9 10 ┌────────────────────┐ ┌──────────────────┐ │@Primary │<──────│ JdbcTemplate │ │RoutingDataSource │ └──────────────────┘ │ ┌────────────────┐ │ ┌──────────────────┐ │ │MasterDataSource│ │<──────│DataSource │ │ └────────────────┘ │ │TransactionManager│ │ ┌────────────────┐ │ └──────────────────┘ │ │SlaveDataSource │ │ │ └────────────────┘ │ └────────────────────┘
注意到DataSourceTransactionManager和JdbcTemplate引用的都是RoutingDataSource,所以,这种设计的一个限制就是:在一个请求中,一旦切换了内部数据源,在同一个事务中,不能再切到另一个,否则,DataSourceTransactionManager和JdbcTemplate操作的就不是同一个数据库连接。
练习
禁用DataSourceAutoConfiguration并配置多数据源。
下载练习
小结
可以通过@EnableAutoConfiguration(exclude = {...})指定禁用的自动配置;
可以通过@Import({...})导入自定义配置。
添加Filter
我们在Spring中已经学过了集成Filter ,本质上就是通过代理,把Spring管理的Bean注册到Servlet容器中,不过步骤比较繁琐,需要配置web.xml。
在Spring Boot中,添加一个Filter更简单了,可以做到零配置。我们来看看在Spring Boot中如何添加Filter。
Spring Boot会自动扫描所有的FilterRegistrationBean类型的Bean,然后,将它们返回的Filter自动注册到Servlet容器中,无需任何配置。
我们还是以AuthFilter为例,首先编写一个AuthFilterRegistrationBean,它继承自FilterRegistrationBean:
1 2 3 4 5 6 7 8 9 10 11 12 13 14 15 @Component public class AuthFilterRegistrationBean extends FilterRegistrationBean <Filter> { @Autowired UserService userService; @Override public Filter getFilter () { setOrder(10 ); return new AuthFilter (); } class AuthFilter implements Filter { ... } }
FilterRegistrationBean本身不是Filter,它实际上是Filter的工厂。Spring Boot会调用getFilter(),把返回的Filter注册到Servlet容器中。因为我们可以在FilterRegistrationBean中注入需要的资源,然后,在返回的AuthFilter中,这个内部类可以引用外部类的所有字段,自然也包括注入的UserService,所以,整个过程完全基于Spring的IoC容器完成。
再注意到AuthFilterRegistrationBean使用了setOrder(10),因为Spring Boot支持给多个Filter排序,数字小的在前面,所以,多个Filter的顺序是可以固定的。
我们再编写一个ApiFilter,专门过滤/api/*这样的URL。首先编写一个ApiFilterRegistrationBean
1 2 3 4 5 6 7 8 9 10 11 12 13 @Component public class ApiFilterRegistrationBean extends FilterRegistrationBean <Filter> { @PostConstruct public void init () { setOrder(20 ); setFilter(new ApiFilter ()); setUrlPatterns(List.of("/api/*" )); } class ApiFilter implements Filter { ... } }
这个ApiFilterRegistrationBean和AuthFilterRegistrationBean又有所不同。因为我们要过滤URL,而不是针对所有URL生效,因此,在@PostConstruct方法中,通过setFilter()设置一个Filter实例后,再调用setUrlPatterns()传入要过滤的URL列表。
练习
在Spring Boot中添加Filter并指定顺序。
下载练习
小结
在Spring Boot中添加Filter更加方便,并且支持对多个Filter进行排序。
和Spring相比,使用Spring Boot通过自动配置来集成第三方组件通常来说更简单。
我们将详细介绍如何通过Spring Boot集成常用的第三方组件,包括:
Open API
Redis
Artemis
RabbitMQ
Kafka
Open API 是一个标准,它的主要作用是描述REST API,既可以作为文档给开发者阅读,又可以让机器根据这个文档自动生成客户端代码等。
在Spring Boot应用中,假设我们编写了一堆REST API,如何添加Open API的支持?
我们只需要在pom.xml中加入以下依赖:
org.springdoc:springdoc-openapi-starter-webmvc-ui:2.0.0
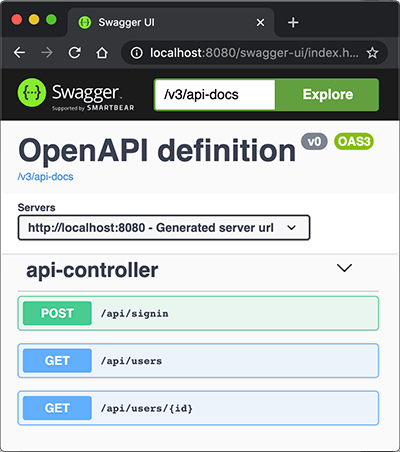
然后呢?没有然后了,直接启动应用,打开浏览器输入http://localhost:8080/swagger-ui.html:
立刻可以看到自动生成的API文档,这里列出了3个API,来自api-controller(因为定义在ApiController这个类中),点击某个API还可以交互,即输入API参数,点“Try it out”按钮,获得运行结果。
是不是太方便了!
因为我们引入springdoc-openapi-ui这个依赖后,它自动引入Swagger UI用来创建API文档。可以给API加入一些描述信息,例如:
1 2 3 4 5 6 7 8 9 10 11 @RestController @RequestMapping("/api") public class ApiController { ... @Operation(summary = "Get specific user object by it's id.") @GetMapping("/users/{id}") public User user (@Parameter(description = "id of the user.") @PathVariable("id") long id) { return userService.getUserById(id); } ... }
@Operation可以对API进行描述,@Parameter可以对参数进行描述,它们的目的是用于生成API文档的描述信息。添加了描述的API文档如下:
大多数情况下,不需要任何配置,我们就直接得到了一个运行时动态生成的可交互的API文档,该API文档总是和代码保持同步,大大简化了文档的编写工作。
要自定义文档的样式、控制某些API显示等,请参考springdoc文档 。
配置反向代理
如果在服务器上,用户访问的域名是https://example.com,但内部是通过类似Nginx这样的反向代理访问实际的Spring Boot应用,比如http://localhost:8080,这个时候,在页面https://example.com/swagger-ui.html上,显示的URL仍然是http://localhost:8080,这样一来,就无法直接在页面执行API,非常不方便。
这是因为Spring Boot内置的Tomcat默认获取的服务器名称是localhost,端口是实际监听端口,而不是对外暴露的域名和80或443端口。要让Tomcat获取到对外暴露的域名等信息,必须在Nginx配置中传入必要的HTTP Header,常用的配置如下:
1 2 3 4 5 6 7 8 9 10 11 12 # Nginx配置 server { ... location / { proxy_pass http://localhost:8080; proxy_set_header Host $host; proxy_set_header X-Real-IP $remote_addr; proxy_set_header X-Forwarded-Proto $scheme; proxy_set_header X-Forwarded-For $proxy_add_x_forwarded_for; } ... }
然后,在Spring Boot的application.yml中,加入如下配置:
1 2 3 4 5 server: port: 8080 forward-headers-strategy: native
重启Spring Boot应用,即可在Swagger中显示正确的URL。
练习
利用springdoc实现API文档。
下载练习
小结
使用springdoc让其自动创建API文档非常容易,引入依赖后无需任何配置即可访问交互式API文档。
可以对API添加注解以便生成更详细的描述。
在Spring Boot中,要访问Redis,可以直接引入spring-boot-starter-data-redis依赖,它实际上是Spring Data的一个子项目——Spring Data Redis,主要用到了这几个组件:
Lettuce:一个基于Netty的高性能Redis客户端;
RedisTemplate:一个类似于JdbcTemplate的接口,用于简化Redis的操作。
因为Spring Data Redis引入的依赖项很多,如果只是为了使用Redis,完全可以只引入Lettuce,剩下的操作都自己来完成。
本节我们稍微深入一下Redis的客户端,看看怎么一步一步把一个第三方组件引入到Spring Boot中。
首先,我们添加必要的几个依赖项:
io.lettuce:lettuce-core
org.apache.commons:commons-pool2
注意我们并未指定版本号,因为在spring-boot-starter-parent中已经把常用组件的版本号确定下来了。
第一步是在配置文件application.yml中添加Redis的相关配置:
1 2 3 4 5 6 7 spring: redis: host: ${REDIS_HOST:localhost} port: ${REDIS_PORT:6379} password: ${REDIS_PASSWORD:} ssl: ${REDIS_SSL:false} database: ${REDIS_DATABASE:0}
然后,通过RedisConfiguration来加载它:
1 2 3 4 5 6 7 8 9 @ConfigurationProperties("spring.redis") public class RedisConfiguration { private String host; private int port; private String password; private int database; }
再编写一个@Bean方法来创建RedisClient,可以直接放在RedisConfiguration中:
1 2 3 4 5 6 7 8 9 10 11 12 13 @ConfigurationProperties("spring.redis") public class RedisConfiguration { ... @Bean RedisClient redisClient () { RedisURI uri = RedisURI.Builder.redis(this .host, this .port) .withPassword(this .password) .withDatabase(this .database) .build(); return RedisClient.create(uri); } }
在启动入口引入该配置:
1 2 3 4 5 @SpringBootApplication @Import(RedisConfiguration.class) public class Application { ... }
注意:如果在RedisConfiguration中标注@Configuration,则可通过Spring Boot的自动扫描机制自动加载,否则,使用@Import手动加载。
紧接着,我们用一个RedisService来封装所有的Redis操作。基础代码如下:
1 2 3 4 5 6 7 8 9 10 11 12 13 14 15 16 17 18 19 20 21 22 23 @Component public class RedisService { @Autowired RedisClient redisClient; GenericObjectPool<StatefulRedisConnection<String, String>> redisConnectionPool; @PostConstruct public void init () { GenericObjectPoolConfig<StatefulRedisConnection<String, String>> poolConfig = new GenericObjectPoolConfig <>(); poolConfig.setMaxTotal(20 ); poolConfig.setMaxIdle(5 ); poolConfig.setTestOnReturn(true ); poolConfig.setTestWhileIdle(true ); this .redisConnectionPool = ConnectionPoolSupport.createGenericObjectPool(() -> redisClient.connect(), poolConfig); } @PreDestroy public void shutdown () { this .redisConnectionPool.close(); this .redisClient.shutdown(); } }
注意到上述代码引入了Commons Pool的一个对象池,用于缓存Redis连接。因为Lettuce本身是基于Netty的异步驱动,在异步访问时并不需要创建连接池,但基于Servlet模型的同步访问时,连接池是有必要的。连接池在@PostConstruct方法中初始化,在@PreDestroy方法中关闭。
下一步,是在RedisService中添加Redis访问方法。为了简化代码,我们仿照JdbcTemplate.execute(ConnectionCallback)方法,传入回调函数,可大幅减少样板代码。
首先定义回调函数接口SyncCommandCallback:
1 2 3 4 5 @FunctionalInterface public interface SyncCommandCallback <T> { T doInConnection (RedisCommands<String, String> commands) ; }
编写executeSync方法,在该方法中,获取Redis连接,利用callback操作Redis,最后释放连接,并返回操作结果:
1 2 3 4 5 6 7 8 9 10 public <T> T executeSync (SyncCommandCallback<T> callback) { try (StatefulRedisConnection<String, String> connection = redisConnectionPool.borrowObject()) { connection.setAutoFlushCommands(true ); RedisCommands<String, String> commands = connection.sync(); return callback.doInConnection(commands); } catch (Exception e) { logger.warn("executeSync redis failed." , e); throw new RuntimeException (e); } }
有的童鞋觉得这样访问Redis的代码太复杂了,实际上我们可以针对常用操作把它封装一下,例如set和get命令:
1 2 3 4 5 6 7 public String set (String key, String value) { return executeSync(commands -> commands.set(key, value)); } public String get (String key) { return executeSync(commands -> commands.get(key)); }
类似的,hget和hset操作如下:
1 2 3 4 5 6 7 8 9 10 11 public boolean hset (String key, String field, String value) { return executeSync(commands -> commands.hset(key, field, value)); } public String hget (String key, String field) { return executeSync(commands -> commands.hget(key, field)); } public Map<String, String> hgetall (String key) { return executeSync(commands -> commands.hgetall(key)); }
常用命令可以提供方法接口,如果要执行任意复杂的操作,就可以通过executeSync(SyncCommandCallback<T>)来完成。
完成了RedisService后,我们就可以使用Redis了。例如,在UserController中,我们在Session中只存放登录用户的ID,用户信息存放到Redis,提供两个方法用于读写:
1 2 3 4 5 6 7 8 9 10 11 12 13 14 15 16 17 18 19 20 21 22 23 24 25 26 @Controller public class UserController { public static final String KEY_USER_ID = "__userid__" ; public static final String KEY_USERS = "__users__" ; @Autowired ObjectMapper objectMapper; @Autowired RedisService redisService; private void putUserIntoRedis (User user) throws Exception { redisService.hset(KEY_USERS, user.getId().toString(), objectMapper.writeValueAsString(user)); } private User getUserFromRedis (HttpSession session) throws Exception { Long id = (Long) session.getAttribute(KEY_USER_ID); if (id != null ) { String s = redisService.hget(KEY_USERS, id.toString()); if (s != null ) { return objectMapper.readValue(s, User.class); } } return null ; } ... }
用户登录成功后,把ID放入Session,把User实例放入Redis:
1 2 3 4 5 6 7 8 9 10 11 @PostMapping("/signin") public ModelAndView doSignin (@RequestParam("email") String email, @RequestParam("password") String password, HttpSession session) throws Exception { try { User user = userService.signin(email, password); session.setAttribute(KEY_USER_ID, user.getId()); putUserIntoRedis(user); } catch (RuntimeException e) { return new ModelAndView ("signin.html" , Map.of("email" , email, "error" , "Signin failed" )); } return new ModelAndView ("redirect:/profile" ); }
需要获取User时,从Redis取出:
1 2 3 4 5 6 7 8 @GetMapping("/profile") public ModelAndView profile (HttpSession session) throws Exception { User user = getUserFromRedis(session); if (user == null ) { return new ModelAndView ("redirect:/signin" ); } return new ModelAndView ("profile.html" , Map.of("user" , user)); }
从Redis读写Java对象时,序列化和反序列化是应用程序的工作,上述代码使用JSON作为序列化方案,简单可靠。也可将相关序列化操作封装到RedisService中,这样可以提供更加通用的方法:
1 2 3 4 5 6 7 public <T> T get (String key, Class<T> clazz) { ... } public <T> T set (String key, T value) { ... }
练习
在Spring Boot中访问Redis。
下载练习
小结
Spring Boot默认使用Lettuce作为Redis客户端,同步使用时,应通过连接池提高效率。
集成Artemis
ActiveMQ Artemis是一个JMS服务器,在集成JMS 一节中我们已经详细讨论了如何在Spring中集成Artemis,本节我们讨论如何在Spring Boot中集成Artemis。
我们还是以实际工程为例,创建一个springboot-jms工程,引入的依赖除了spring-boot-starter-web,spring-boot-starter-jdbc等以外,新增spring-boot-starter-artemis:
1 2 3 4 <dependency > <groupId > org.springframework.boot</groupId > <artifactId > spring-boot-starter-artemis</artifactId > </dependency >
同样无需指定版本号。
如何创建Artemis服务器我们已经在集成JMS一节中详细讲述了,此处不再重复。创建Artemis服务器后,我们在application.yml中加入相关配置:
1 2 3 4 5 6 7 8 9 10 spring: artemis: mode: native host: 127.0 .0 .1 port: 61616 user: admin password: password
和Spring版本的JMS代码相比,使用Spring Boot集成JMS时,只要引入了spring-boot-starter-artemis,Spring Boot会自动创建JMS相关的ConnectionFactory、JmsListenerContainerFactory、JmsTemplate等,无需我们再手动配置了。
发送消息时只需要引入JmsTemplate:
1 2 3 4 5 6 7 8 9 10 11 12 13 14 @Component public class MessagingService { @Autowired JmsTemplate jmsTemplate; public void sendMailMessage () throws Exception { String text = "..." ; jmsTemplate.send("jms/queue/mail" , new MessageCreator () { public Message createMessage (Session session) throws JMSException { return session.createTextMessage(text); } }); } }
接收消息时只需要标注@JmsListener:
1 2 3 4 5 6 7 8 9 @Component public class MailMessageListener { final Logger logger = LoggerFactory.getLogger(getClass()); @JmsListener(destination = "jms/queue/mail", concurrency = "10") public void onMailMessageReceived (Message message) throws Exception { logger.info("received message: " + message); } }
可见,应用程序收发消息的逻辑和Spring中使用JMS完全相同,只是通过Spring Boot,我们把工程简化到只需要设定Artemis相关配置。
练习
在Spring Boot中使用Artemis。
下载练习
小结
在Spring Boot中使用Artemis作为JMS服务时,只需引入spring-boot-starter-artemis依赖,即可直接使用JMS。
前面我们讲了ActiveMQ Artemis,它实现了JMS的消息服务协议。JMS是JavaEE的消息服务标准接口,但是,如果Java程序要和另一种语言编写的程序通过消息服务器进行通信,那么JMS就不太适合了。
AMQP是一种使用广泛的独立于语言的消息协议,它的全称是Advanced Message Queuing Protocol,即高级消息队列协议,它定义了一种二进制格式的消息流,任何编程语言都可以实现该协议。实际上,Artemis也支持AMQP,但实际应用最广泛的AMQP服务器是使用Erlang 编写的RabbitMQ 。
安装RabbitMQ
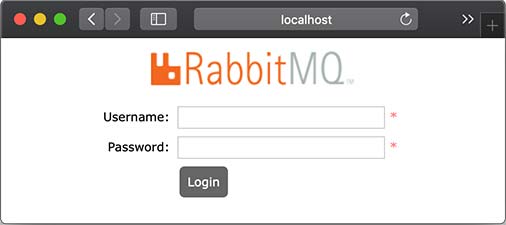
我们先从RabbitMQ的官网下载 并安装RabbitMQ,安装和启动RabbitMQ请参考官方文档。要验证启动是否成功,可以访问RabbitMQ的管理后台http://localhost:15672 ,如能看到登录界面表示RabbitMQ启动成功:
RabbitMQ后台管理的默认用户名和口令均为guest。
AMQP协议
AMQP协议和前面我们介绍的JMS协议有所不同。在JMS中,有两种类型的消息通道:
点对点的Queue,即Producer发送消息到指定的Queue,接收方从Queue收取消息;
一对多的Topic,即Producer发送消息到指定的Topic,任意多个在线的接收方均可从Topic获得一份完整的消息副本。
但是AMQP协议比JMS要复杂一点,它只有Queue,没有Topic,并且引入了Exchange的概念。当Producer想要发送消息的时候,它将消息发送给Exchange,由Exchange将消息根据各种规则投递到一个或多个Queue:
1 2 3 4 5 6 7 8 9 10 11 ┌───────┐ ┌──▶│Queue-1│ ┌──────────┐ │ └───────┘ ┌──▶│Exchange-1│──┤ ┌──────────┐ │ └──────────┘ │ ┌───────┐ │Producer-1│──┤ ├──▶│Queue-2│ └──────────┘ │ ┌──────────┐ │ └───────┘ └──▶│Exchange-2│──┤ └──────────┘ │ ┌───────┐ └──▶│Queue-3│ └───────┘
如果某个Exchange总是把消息发送到固定的Queue,那么这个消息通道就相当于JMS的Queue。如果某个Exchange把消息发送到多个Queue,那么这个消息通道就相当于JMS的Topic。和JMS的Topic相比,Exchange的投递规则更灵活,比如一个“登录成功”的消息被投递到Queue-1和Queue-2,而“登录失败”的消息则被投递到Queue-3。这些路由规则称之为Binding,通常都在RabbitMQ的管理后台设置。
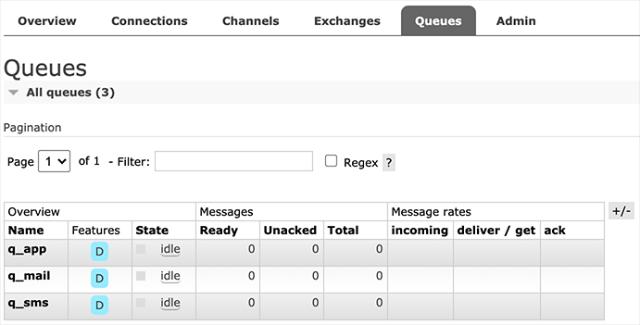
我们以具体的业务为例子,在RabbitMQ中,首先创建3个Queue,分别用于发送邮件、短信和App通知:
创建Queue时注意到可配置为持久化(Durable)和非持久化(Transient),当Consumer不在线时,持久化的Queue会暂存消息,非持久化的Queue会丢弃消息。
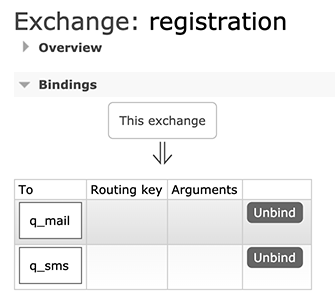
紧接着,我们在Exchanges中创建一个Direct类型的Exchange,命名为registration,并添加如下两个Binding:
上述Binding的规则就是:凡是发送到registration这个Exchange的消息,均被发送到q_mail和q_sms这两个Queue。
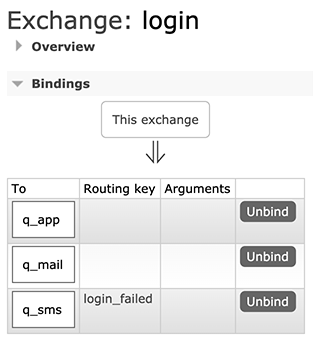
我们再创建一个Direct类型的Exchange,命名为login,并添加如下Binding:
上述Binding的规则稍微复杂一点,当发送消息给login这个Exchange时,如果消息没有指定Routing Key,则被投递到q_app和q_mail,如果消息指定了Routing Key=“login_failed”,那么消息被投递到q_sms。
配置好RabbitMQ后,我们就可以基于Spring Boot开发AMQP程序。
使用RabbitMQ
我们首先创建Spring Boot工程springboot-rabbitmq,并添加如下依赖引入RabbitMQ:
1 2 3 4 <dependency > <groupId > org.springframework.boot</groupId > <artifactId > spring-boot-starter-amqp</artifactId > </dependency >
然后在application.yml中添加RabbitMQ相关配置:
1 2 3 4 5 6 spring: rabbitmq: host: localhost port: 5672 username: guest password: guest
我们还需要在Application中添加一个MessageConverter:
1 2 3 4 5 6 7 8 9 10 11 import org.springframework.amqp.support.converter.MessageConverter;@SpringBootApplication public class Application { ... @Bean MessageConverter createMessageConverter () { return new Jackson2JsonMessageConverter (); } }
MessageConverter用于将Java对象转换为RabbitMQ的消息。默认情况下,Spring Boot使用SimpleMessageConverter,只能发送String和byte[]类型的消息,不太方便。使用Jackson2JsonMessageConverter,我们就可以发送JavaBean对象,由Spring Boot自动序列化为JSON并以文本消息传递。
因为引入了starter,所有RabbitMQ相关的Bean均自动装配,我们需要在Producer注入的是RabbitTemplate:
1 2 3 4 5 6 7 8 9 10 11 12 13 14 @Component public class MessagingService { @Autowired RabbitTemplate rabbitTemplate; public void sendRegistrationMessage (RegistrationMessage msg) { rabbitTemplate.convertAndSend("registration" , "" , msg); } public void sendLoginMessage (LoginMessage msg) { String routingKey = msg.success ? "" : "login_failed" ; rabbitTemplate.convertAndSend("login" , routingKey, msg); } }
发送消息时,使用convertAndSend(exchange, routingKey, message)可以指定Exchange、Routing Key以及消息本身。这里传入JavaBean后会自动序列化为JSON文本。上述代码将RegistrationMessage发送到registration,将LoginMessage发送到login,并根据登录是否成功来指定Routing Key。
接收消息时,需要在消息处理的方法上标注@RabbitListener:
1 2 3 4 5 6 7 8 9 10 11 12 13 14 15 16 17 18 19 20 21 22 23 24 25 26 27 28 29 30 31 32 33 @Component public class QueueMessageListener { final Logger logger = LoggerFactory.getLogger(getClass()); static final String QUEUE_MAIL = "q_mail" ; static final String QUEUE_SMS = "q_sms" ; static final String QUEUE_APP = "q_app" ; @RabbitListener(queues = QUEUE_MAIL) public void onRegistrationMessageFromMailQueue (RegistrationMessage message) throws Exception { logger.info("queue {} received registration message: {}" , QUEUE_MAIL, message); } @RabbitListener(queues = QUEUE_SMS) public void onRegistrationMessageFromSmsQueue (RegistrationMessage message) throws Exception { logger.info("queue {} received registration message: {}" , QUEUE_SMS, message); } @RabbitListener(queues = QUEUE_MAIL) public void onLoginMessageFromMailQueue (LoginMessage message) throws Exception { logger.info("queue {} received message: {}" , QUEUE_MAIL, message); } @RabbitListener(queues = QUEUE_SMS) public void onLoginMessageFromSmsQueue (LoginMessage message) throws Exception { logger.info("queue {} received message: {}" , QUEUE_SMS, message); } @RabbitListener(queues = QUEUE_APP) public void onLoginMessageFromAppQueue (LoginMessage message) throws Exception { logger.info("queue {} received message: {}" , QUEUE_APP, message); } }
上述代码一共定义了5个Consumer,监听3个Queue。
启动应用程序,我们注册一个新用户,然后发送一条RegistrationMessage消息。此时,根据registration这个Exchange的设定,我们会在两个Queue收到消息:
1 2 3 4 ... c.i.learnjava.service.UserService : try register by bob@example.com... ... c.i.learnjava.web.UserController : user registered: bob@example.com ... c.i.l.service.QueueMessageListener : queue q_mail received registration message: [RegistrationMessage: email=bob@example.com, name=Bob, timestamp=1594559871495] ... c.i.l.service.QueueMessageListener : queue q_sms received registration message: [RegistrationMessage: email=bob@example.com, name=Bob, timestamp=1594559871495]
当我们登录失败时,发送LoginMessage并设定Routing Key为login_failed,此时,只有q_sms会收到消息:
1 2 ... c.i.learnjava.service.UserService : try login by bob@example.com... ... c.i.l.service.QueueMessageListener : queue q_sms received message: [LoginMessage: email=bob@example.com, name=(unknown), success=false, timestamp=1594559886722]
登录成功后,发送LoginMessage,此时,q_mail和q_app将收到消息:
1 2 3 ... c.i.learnjava.service.UserService : try login by bob@example.com... ... c.i.l.service.QueueMessageListener : queue q_mail received message: [LoginMessage: email=bob@example.com, name=Bob, success=true, timestamp=1594559895251] ... c.i.l.service.QueueMessageListener : queue q_app received message: [LoginMessage: email=bob@example.com, name=Bob, success=true, timestamp=1594559895251]
RabbitMQ还提供了使用Topic的Exchange(此Topic指消息的标签,并非JMS的Topic概念),可以使用*进行匹配并路由。可见,掌握RabbitMQ的核心是理解其消息的路由规则。
直接指定一个Queue并投递消息也是可以的,此时指定Routing Key为Queue的名称即可,因为RabbitMQ提供了一个default exchange用于根据Routing Key查找Queue并直接投递消息到指定的Queue。但是要实现一对多的投递就必须自己配置Exchange。
练习
在Spring Boot中使用RabbitMQ。
下载练习
小结
Spring Boot提供了AMQP的集成,默认使用RabbitMQ作为AMQP消息服务器。
使用RabbitMQ发送消息时,理解Exchange如何路由至一个或多个Queue至关重要。
我们在前面已经介绍了JMS和AMQP,JMS是JavaEE的标准消息接口,Artemis是一个JMS实现产品,AMQP是跨语言的一个标准消息接口,RabbitMQ是一个AMQP实现产品。
Kafka也是一个消息服务器,它的特点一是快,二是有巨大的吞吐量,那么Kafka实现了什么标准消息接口呢?
Kafka没有实现任何标准的消息接口,它自己提供的API就是Kafka的接口。
哥没有实现任何标准,哥自己就是标准。
—— Kafka
Kafka本身是Scala编写的,运行在JVM之上。Producer和Consumer都通过Kafka的客户端使用网络来与之通信。从逻辑上讲,Kafka设计非常简单,它只有一种类似JMS的Topic的消息通道:
1 2 3 4 5 6 7 8 9 ┌──────────┐ ┌──▶│Consumer-1│ │ └──────────┘ ┌────────┐ ┌─────┐ │ ┌──────────┐ │Producer│───▶│Topic│──┼──▶│Consumer-2│ └────────┘ └─────┘ │ └──────────┘ │ ┌──────────┐ └──▶│Consumer-3│ └──────────┘
那么Kafka如何支持十万甚至百万的并发呢?答案是分区。Kafka的一个Topic可以有一个至多个Partition,并且可以分布到多台机器上:
1 2 3 4 5 6 7 8 9 10 11 12 13 ┌ ─ ─ ─ ─ ─ ─ ─ ─ ─ ┐ Topic │ │ ┌───────────┐ ┌──────────┐ │┌─▶│Partition-1│──┐│┌──▶│Consumer-1│ │ └───────────┘ │ │ └──────────┘ ┌────────┐ ││ ┌───────────┐ │││ ┌──────────┐ │Producer│───┼─▶│Partition-2│──┼─┼──▶│Consumer-2│ └────────┘ ││ └───────────┘ │││ └──────────┘ │ ┌───────────┐ │ │ ┌──────────┐ │└─▶│Partition-3│──┘│└──▶│Consumer-3│ └───────────┘ └──────────┘ └ ─ ─ ─ ─ ─ ─ ─ ─ ─ ┘
Kafka只保证在一个Partition内部,消息是有序的,但是,存在多个Partition的情况下,Producer发送的3个消息会依次发送到Partition-1、Partition-2和Partition-3,Consumer从3个Partition接收的消息并不一定是Producer发送的顺序,因此,多个Partition只能保证接收消息大概率按发送时间有序,并不能保证完全按Producer发送的顺序。这一点在使用Kafka作为消息服务器时要特别注意,对发送顺序有严格要求的Topic只能有一个Partition。
Kafka的另一个特点是消息发送和接收都尽量使用批处理,一次处理几十甚至上百条消息,比一次一条效率要高很多。
最后要注意的是消息的持久性。Kafka总是将消息写入Partition对应的文件,消息保存多久取决于服务器的配置,可以按照时间删除(默认3天),也可以按照文件大小删除,因此,只要Consumer在离线期内的消息还没有被删除,再次上线仍然可以接收到完整的消息流。这一功能实际上是客户端自己实现的,客户端会存储它接收到的最后一个消息的offsetId,再次上线后按上次的offsetId查询。offsetId是Kafka标识某个Partion的每一条消息的递增整数,客户端通常将它存储在ZooKeeper中。
有了Kafka消息设计的基本概念,我们来看看如何在Spring Boot中使用Kafka。
安装Kafka
首先从Kafka官网下载 最新版Kafaka,解压后在bin目录找到两个文件:
zookeeper-server-start.sh:启动ZooKeeper(已内置在Kafka中);kafka-server-start.sh:启动Kafka。
先启动ZooKeeper:
1 $ ./zookeeper-server-start.sh ../config/zookeeper.properties
再启动Kafka:
1 ./kafka-server-start.sh ../config/server.properties
看到如下输出表示启动成功:
1 ... INFO [KafkaServer id=0] started (kafka.server.KafkaServer)
如果要关闭Kafka和ZooKeeper,依次按Ctrl-C退出即可。注意这是在本地开发时使用Kafka的方式,线上Kafka服务推荐使用云服务厂商托管模式(AWS的MSK,阿里云的消息队列Kafka版)。
使用Kafka
在Spring Boot中使用Kafka,首先要引入依赖:
1 2 3 4 <dependency > <groupId > org.springframework.kafka</groupId > <artifactId > spring-kafka</artifactId > </dependency >
注意这个依赖是spring-kafka项目提供的。
然后,在application.yml中添加Kafka配置:
1 2 3 4 5 6 7 spring: kafka: bootstrap-servers: localhost:9092 consumer: auto-offset-reset: latest max-poll-records: 100 max-partition-fetch-bytes: 1000000
除了bootstrap-servers必须指定外,consumer相关的配置项均为调优选项。例如,max-poll-records表示一次最多抓取100条消息。配置名称去哪里看?IDE里定义一个KafkaProperties.Consumer的变量:
1 KafkaProperties.Consumer c = null ;
然后按住Ctrl查看源码即可。
发送消息
Spring Boot自动为我们创建一个KafkaTemplate用于发送消息。注意到这是一个泛型类,而默认配置总是使用String作为Kafka消息的类型,所以注入KafkaTemplate<String, String>即可:
1 2 3 4 5 6 7 8 9 10 11 12 13 14 15 16 17 18 19 20 @Component public class MessagingService { @Autowired ObjectMapper objectMapper; @Autowired KafkaTemplate<String, String> kafkaTemplate; public void sendRegistrationMessage (RegistrationMessage msg) throws IOException { send("topic_registration" , msg); } public void sendLoginMessage (LoginMessage msg) throws IOException { send("topic_login" , msg); } private void send (String topic, Object msg) throws IOException { ProducerRecord<String, String> pr = new ProducerRecord <>(topic, objectMapper.writeValueAsString(msg)); pr.headers().add("type" , msg.getClass().getName().getBytes(StandardCharsets.UTF_8)); kafkaTemplate.send(pr); } }
发送消息时,需指定Topic名称,消息正文。为了发送一个JavaBean,这里我们没有使用MessageConverter来转换JavaBean,而是直接把消息类型作为Header添加到消息中,Header名称为type,值为Class全名。消息正文是序列化的JSON。
接收消息
接收消息可以使用@KafkaListener注解:
1 2 3 4 5 6 7 8 9 10 11 12 13 14 15 16 17 18 19 20 21 22 23 24 25 26 27 28 29 30 31 32 33 34 35 @Component public class TopicMessageListener { private final Logger logger = LoggerFactory.getLogger(getClass()); @Autowired ObjectMapper objectMapper; @KafkaListener(topics = "topic_registration", groupId = "group1") public void onRegistrationMessage (@Payload String message, @Header("type") String type) throws Exception { RegistrationMessage msg = objectMapper.readValue(message, getType(type)); logger.info("received registration message: {}" , msg); } @KafkaListener(topics = "topic_login", groupId = "group1") public void onLoginMessage (@Payload String message, @Header("type") String type) throws Exception { LoginMessage msg = objectMapper.readValue(message, getType(type)); logger.info("received login message: {}" , msg); } @KafkaListener(topics = "topic_login", groupId = "group2") public void processLoginMessage (@Payload String message, @Header("type") String type) throws Exception { LoginMessage msg = objectMapper.readValue(message, getType(type)); logger.info("process login message: {}" , msg); } @SuppressWarnings("unchecked") private static <T> Class<T> getType (String type) { try { return (Class<T>) Class.forName(type); } catch (ClassNotFoundException e) { throw new RuntimeException (e); } } }
在接收消息的方法中,使用@Payload表示传入的是消息正文,使用@Header可传入消息的指定Header,这里传入@Header("type"),就是我们发送消息时指定的Class全名。接收消息时,我们需要根据Class全名来反序列化获得JavaBean。
上述代码一共定义了3个Listener,其中有两个方法监听的是同一个Topic,但它们的Group ID不同。假设Producer发送的消息流是A、B、C、D,Group ID不同表示这是两个不同的Consumer,它们将分别收取完整的消息流,即各自均收到A、B、C、D。Group ID相同的多个Consumer实际上被视作一个Consumer,即如果有两个Group ID相同的Consumer,那么它们各自收到的很可能是A、C和B、D。
运行应用程序,注册新用户后,观察日志输出:
1 2 3 ... c.i.learnjava.service.UserService : try register by bob@example.com... ... c.i.learnjava.web.UserController : user registered: bob@example.com ... c.i.l.service.TopicMessageListener : received registration message: [RegistrationMessage: email=bob@example.com, name=Bob, timestamp=1594637517458]
用户登录后,观察日志输出:
1 2 3 ... c.i.learnjava.service.UserService : try login by bob@example.com... ... c.i.l.service.TopicMessageListener : received login message: [LoginMessage: email=bob@example.com, name=Bob, success=true, timestamp=1594637523470] ... c.i.l.service.TopicMessageListener : process login message: [LoginMessage: email=bob@example.com, name=Bob, success=true, timestamp=1594637523470]
因为Group ID不同,同一个消息被两个Consumer分别独立接收。如果把Group ID改为相同,那么同一个消息只会被两者之一接收。
有细心的童鞋可能会问,在Kafka中是如何创建Topic的?又如何指定某个Topic的分区数量?
实际上开发使用的Kafka默认允许自动创建Topic,创建Topic时默认的分区数量是2,可以通过server.properties修改默认分区数量。
在生产环境中通常会关闭自动创建功能,Topic需要由运维人员先创建好。和RabbitMQ相比,Kafka并不提供网页版管理后台,管理Topic需要使用命令行,比较繁琐,只有云服务商通常会提供更友好的管理后台。
练习
在Spring Boot中使用Kafka。
下载练习
小结
Spring Boot通过KafkaTemplate发送消息,通过@KafkaListener接收消息;
配置Consumer时,指定Group ID非常重要。